Jeremy Moskowitz founded PolicyPak Software after working with hundreds of customers with the same problem they couldn’t manage their applications, browsers and operating systems using the technology they already utilized.
Azure Virtual Desktop: Simple Step-by-Step Walkthrough
Azure Virtual Desktop (AVD) formerly Windows Virtual Desktop (WVD) is not Hyper-V or a rehabilitated version Windows Virtual PC. It doesn’t even install on your local machine like VMware Workstation or VMplayer. Rather, AVD lets you deploy and scale virtualized Windows desktops and apps on Azure Windows Virtual Desktops. If you’re looking for more information about Azure Virtual Desktop, you’ve come to the right place. This Guide to Getting Started is perfect for those IT pros who are researching AVD, starting a trial with AVD or are onboarding AVD.
Table of Contents
Part 1: Before You Get Started
– What is Azure Windows Virtual Desktop?
– Why Cloud, Why Now?
– Benefits of Windows Virtual Desktop
– About This Guide
– Our Methodology
– Executive Overview
– Windows Virtual Desktop Requirements
Part 2: AVD Initial Setup with Azure and Registration
– Consent, and Permissions
– Assigning Users and Administrators
Part 3: Prepping for Your WVD Environment with PowerShell
– Finding Your Azure Subscription ID and Active Directory Tenant ID
– Configuring PowerShell and Connecting to Azure
– Setting Up Windows Virtual Desktop Tenant
Part 4: Configuring Your Domain Controller and Virtual Machines
– Adding, Creating and Configuring Virtual Machines
– Disk Configuration
– Network Configuration
Part 5: Setting up Your VPN
– VPN Configuration
– Resources, Certificates and Other Configurations
– Installing and Connecting Your VPN
Part 6: Completing Your Windows Virtual Desktop Configuration
– Configuring and Connecting Your Domain Controller
– Syncing Azure AD
– Add VMs and Deploy to Azure
– Verify VMs and Assign Users
– Publishing Apps
– Final Thoughts
Part 1: Before You Get Started
What is Azure Virtual Desktop (formerly Windows Virtual Desktop)?
Azure Virtual Desktop (AVD) or Windows Virtual Desktop (WVD) is a desktop and app virtualization service that resides in the cloud and is then accessed by users using a device of their choice. Think of it as Desktop-as-a-Service powered by Azure. WVD delivers a Windows experience that is multi-session yet personable and persistent. While it delivers a Windows 7 experience, most organizations want Windows 10 since support. And of course, it delivers your essential O365 apps to your users.
Why Cloud, Why Now?
While it may seem out of the ordinary to push desktops from the cloud, it is the next step in the evolution of the digital transformation. Similar to how you scale enterprise web-based applications to your employees and customers, you can now quickly deploy desktop with the same scalability potential. If you’ve migrated your applications and data to the cloud, why not host the desktops there too. Centralization keeps everything congregated and increases performance potential. By software defining the desktop, you clip your dependency on rigid hardware and diminishing product lifecycles. While traditional VDI achieves this, deploying a cloud desktop platform is far simpler from a configuration and deployment perspective. Plus, you’re benefiting from the power, security, and scalability of Azure.
Benefits of Windows Virtual Desktop
Companies are undergoing their digital transformations to become more agile, and Windows Virtual Desktop is a prime example of fluid flexibility. Users can access their expected desktop experience regardless of location. Access can be from any device that contains either the WVD native client application or a Windows Virtual Desktop HTML5 web client. Here’s a partial list of what WVD can do for you.
- Virtualize both desktops and apps, then assign and connect users to them
- Virtualize Office 365 ProPlus and deliver it to your users in an optimized environment
- Reduce your CAPEX costs by lessening the impact of hardware product life cycles
- Lower costs by pooling multi-session resources and reduce the number of virtual machines in your environment
- Bring your existing Remote Desktop Services (RDS) and Windows Server desktops and apps to any computer with ease.
- Publish as many host pools as you need to accommodate your diverse workloads
- Reduce your CAPEX costs by reducing the impact of hardware product life cycles
- Provides a unified and simplified management experience for your admins
About This Guide
Of course, we’ve only covered the tip of the iceberg concerning WVD’s potential advantages. It is also just the beginning of an –end-to-end walkthrough of this new approach to desktop deployment.
There ARE other excellent walkthroughs of WVD. This one by Christiaan Brinkhoff is a good start, but we think having another walkthrough might be useful if you get stuck. In other words, two heads are better than one.
Think of our walkthrough as your one-source guide to everything you would need to get started deploying Windows Virtual Desktop in Azure.
Remember: This walkthrough is our experience, and WVD may change over time.
We here at PolicyPak are also proud to be Windows Virtual Desktop Partners … one of the first! So we kind of know what we’re talking about.
That said, we hope this walkthrough helps you get going implement a proof of concept. But, we’re not responsible if these directions don’t work, or, worse, cause some problems in your test lab or your real environment.
Everything in guide is reasonably tested, but not guaranteed, and you should use your brain if something doesn’t feel right to you.
There are some other guides out there that explain how to set up WVD. Again, those guides are useful.
But this is our story, how we did it. We went through every step and fell into each hole, so you don’t have to. We documented every step expressly so you could get started and see what we did, and you can do it too.
Our Methodology
The primary purpose of this article series is to guide you through the process of getting WVD up and running so you can kick the tires and see how this new product can benefit your environment.
Let’s first say that, like many first product releases, the deployment process isn’t as easy as it could be.
In this guide, you will have to run quite a few PowerShell cmdlets.
Do not be intimidated! Okay, maybe a little.
There are also several initial configurations you will have to complete. Let’s quickly say that this isn’t going to be a ten-minute process. However, we have gone through the entire process and have outlined everything you need to know in an easy-to-follow guide.
Executive Overview
Here is a basic outline of the material covered in this guide:
- Security should always be job #1 in whatever we do in IT today. Since our WVD will be running in Azure, we need to set up a Point-to-Site VPN to tunnel our traffic. This process starts with the creation of a virtual network followed by some necessary configurations.
- Like any Windows computer, WVD requires a DNS and AD infrastructure to function within an enterprise, so we will help you ensure these are set up and configured correctly.
- You need Azure AD Connect to unite your on-prem environment with your Azure one. We will guide you through the necessary procedures to ensure that users can authenticate successfully to utilize the new virtual desktops and resources.
- Lastly, we will go over the process of installing the PowerShell cmdlets for managing and interacting with Windows Virtual Desktop.
Windows Virtual Desktop Requirements
Before we dive in, you need to do some homework. There is a small list of things you will need to check off to repeat the outlined steps in this guide.
- You’re going to need to be able to fund the project. You can support the project with enough Azure subscription credits to host the virtual machine resources (TIP: If you don’t have access to a subscription, you can sign up for a free account here. You will need a valid phone number and credit card as Microsoft uses these for identity verification.
- You will need access to your Azure Active Directory.
- You will need access to a user account that has Global Administrator access to Office 365, and owner role on the Azure subscription.
- You need to download and install the Windows Virtual Desktop cmdlets for Windows PowerShell on a Windows 10 machine. These cmdlets are what allows you to do the “actual work” we’ll perform later.
- Traditional Active Directory controls WVD. You can use your existing AD, or you can make a new domain controller in Azure… as if it was sitting in your datacenter. So you’ll need domain admin access to your on-prem AD, or, use this guide to make your own DC in Azure.
So you may have a few things to do until the next leg of the journey. Once you’ve completed your homework, we will roll up our sleeves and begin the initial WVD set up by completing the early configuration steps.
» PRO TIP: Kill Local Admin Rights In WVD
Part 2: Setup and Registration
So let’s get this party started and set out deploying WVD. These initial steps are quick and easy.
You first have to grant consent on behalf of your organization.
Consent, and Permissions
Step 1: Log in
Log in to your Azure Subscription with your global administrator account.
Step 2: Provide Consent
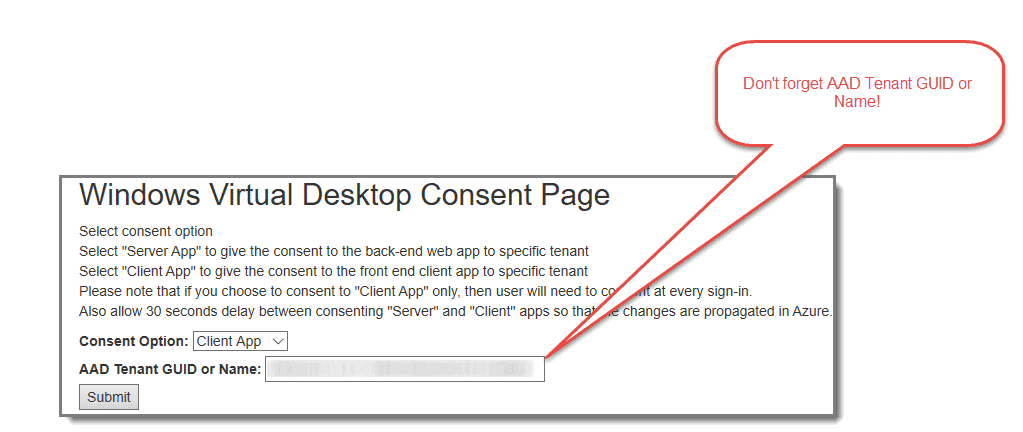
Then open another tab in your web browser and visit the Windows Virtual Desktop Consent Page (https://rdweb.wvd.microsoft.com/).
- Start with the “Consent Option” set to “Server App,” then fill in your “AAD Tenant GUID or name” and hit submit. The Consent page explains what you agree to, as is shown below.

- The GUID is your Azure domain name. The tenant ID is a long alphanumeric identifier that is nearly impossible to remember but easy to look up in your Azure portal.
- Note: You can find your “AAD Tenant GUID or name” by visiting this link: https://portal.azure.com/#blade/Microsoft_AAD_IAM/ActiveDirectoryMenuBlade/Properties
- If there is nothing at that link, then you don’t have an active subscription, sign up at https://azure.microsoft.com/en-us/free/ to get a free one if needed.
Step 3: Accept Permissions
Microsoft will then ask you to accept permissions needed by Windows Virtual Desktop, hit “Accept” when prompted to grant access.
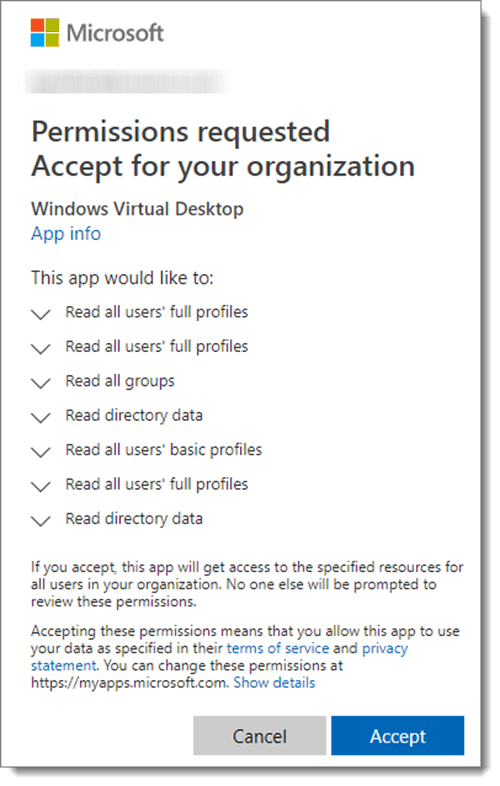
If done correctly, you’ll see the following confirmation:

Next is a rinse and repeat type of process, as we have to repeat the same series of steps except for this time, we choose the Client App.
Step 4: Provide Consent
After a comfortable 30-second wait as suggested, repeat the previous steps and set the “Consent Option” to “Client App,” then fill in your “AAD Tenant GUID or name” and hit submit.
Step 5: Accept Permissions
Once again, Microsoft will then ask you to accept permissions needed by Windows Virtual Desktop Client, hit “Accept” when prompted to grant access.
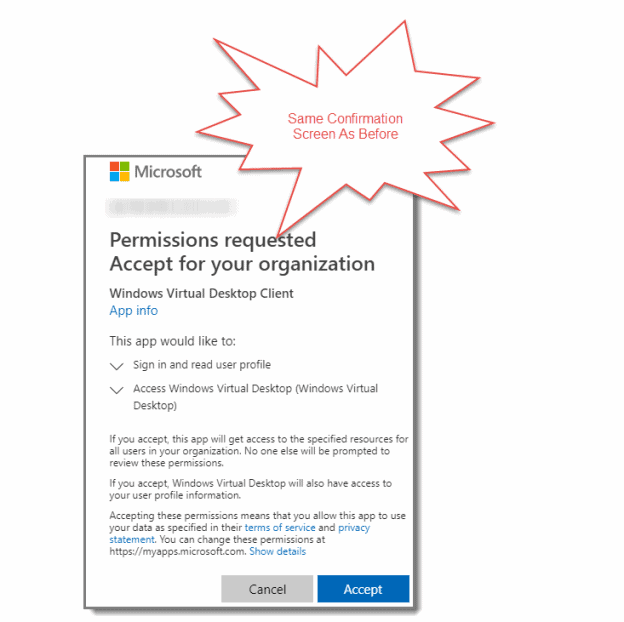
Once again, this is followed by a confirmation of your registration.

Think You Know VDI? Think Again
VDI is a powerful way of ensuring you can deliver a normal Windows image to your BYOD users. But it requires careful implementation to ensure that the user experience is optimal, efficient and secure. The whitepaper shows you some of the key points to watch for in setting and delivering your VDI image to your users, and how adding PolicyPak to your toolbox grants you increased control over both the VDI image and the applications within it.
Assigning Users and Administrators
Step 1: Assign Enterprise Application Administrators
The next step is to Configure Enterprise Application Administrators in Azure AD to grant at least one of your accounts permission to create the Windows Virtual Desktop tenant. Either open “Azure Active Directory” and click on “Enterprise Applications,” or visit this blade in your Azure Portal: https://portal.azure.com/#blade/Microsoft_AAD_IAM/StartboardApplicationsMenuBlade/AllApps/menuId/

Step 2: Go to Windows Virtual Desktop
Next, click on “Windows Virtual Desktop.” You can search for it if it is not visible.

Step 3: Select Users and Groups
Select “Users and Groups,” then click on “Add User.”

Step 4: Assign Users
Search for, then select the user you would like to grant permission to create Windows Virtual Tenants to and then click “Assign.”
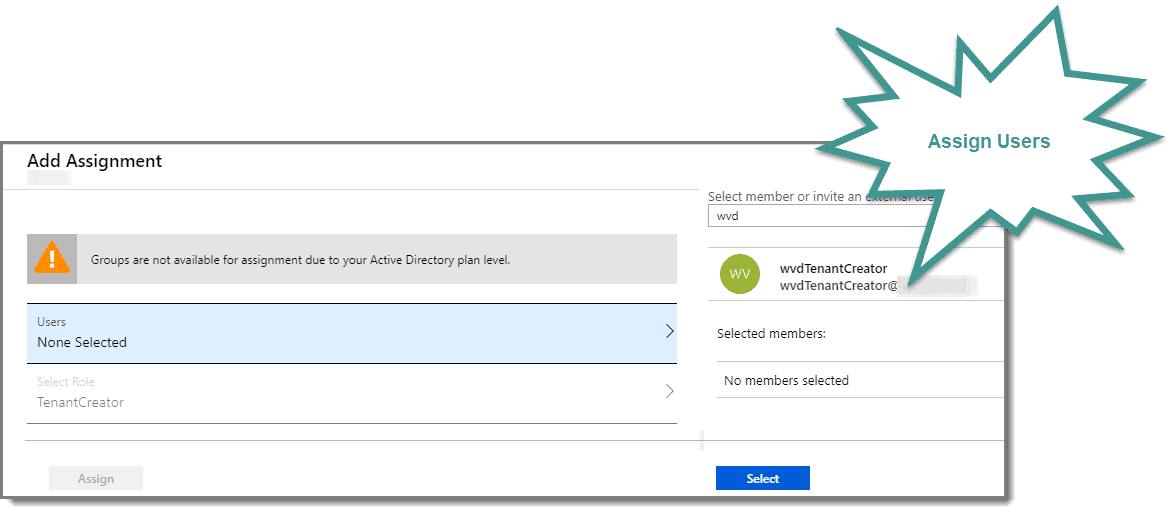
Step 5: Confirm Results
The result should look similar to below

Next, we will have a few more initial steps to go through, and then we will dip our toes in the water and initiate our first PowerShell scripts required for this process.
» PRO TIP: Simplify Start Screen and Taskbar Customization in WVD
Part 3: Prepping Your WVD Environment
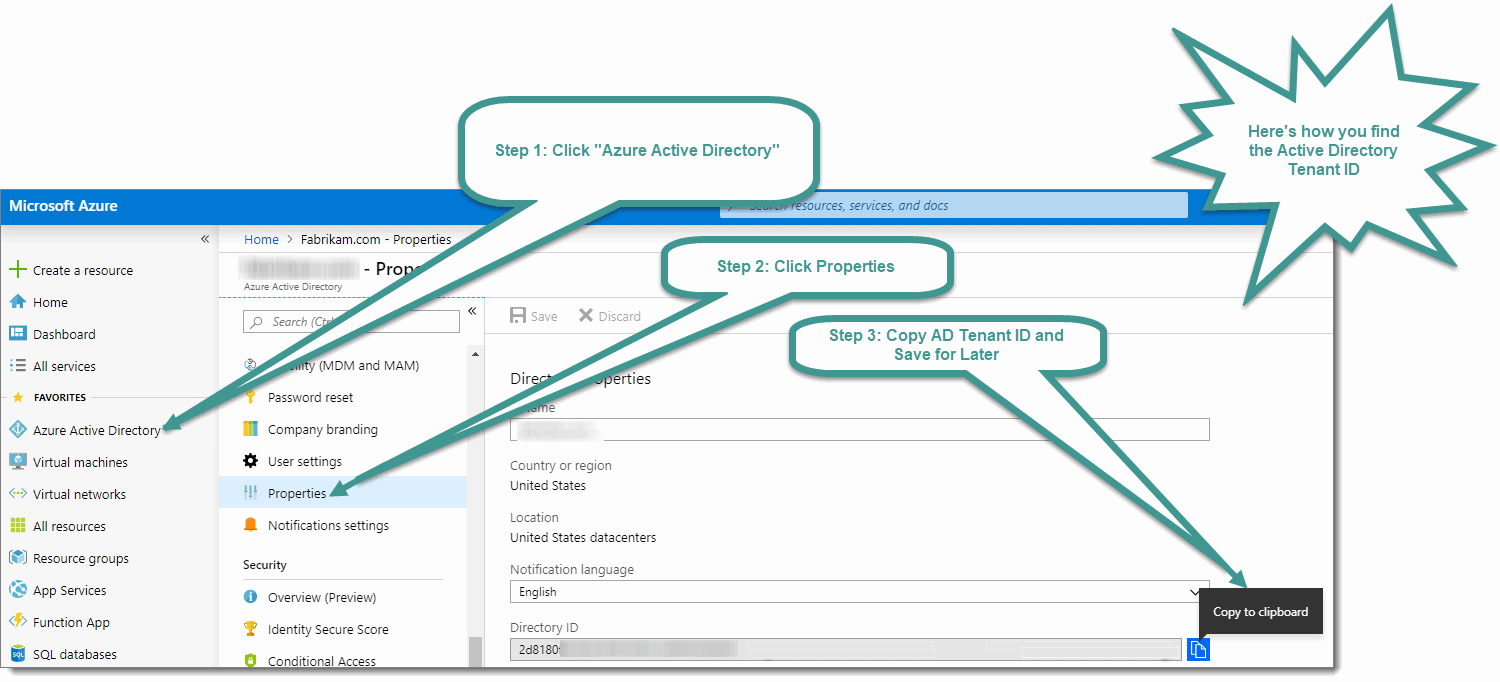
Finding Your Azure Subscription ID and AD Tenant ID
Before we create our VM environment, we have to wrap up a few more initial steps:
- Your Azure Active Directory tenant ID (or Directory ID)
- Your Azure subscription ID
You can find the Active Directory tenant ID (or Directory ID) in the Azure Portal by selecting “Azure Active Directory,” then clicking on “Properties” or by visiting this link while logged into your Azure Portal: https://portal.azure.com/#blade/Microsoft_AAD_IAM/ActiveDirectoryMenuBlade/Properties
Copy the Active Directory tenant ID (or Directory ID), and save it somewhere safe as you need it later.
Step 1: Find Subscription ID
To find the Subscription ID, from the same Azure Portal session either use the “Search” option to search for “Subscriptions” or visit the following link while logged into your Azure Portal:
https://portal.azure.com/#blade/Microsoft_Azure_Billing/SubscriptionsBlade.
Step 2: Copy Subscription ID
Copy the Subscription ID and save it somewhere safe, as you need it later.

Configure PowerShell
Now it’s time for some PowerShell stuff (Sorry if you thought that moving to the cloud would exempt you from PowerShell). Cloud management isn’t always about pointing and clicking in GUI menus. Don’t let this intimidate you, because we’re laying out the sequential steps quickly and clearly.
Step 1: Install PowerShell Modules
First, you need to install the required modules for PowerShell. Remember, in part 2, you got prepared and downloaded the Windows Virtual Desktop cmdlets for Windows PowerShell.
Step 2: Run Commands
After you install the cmdlets, you can run some commands. You can use either PowerShell or PowerShell ISE. I recommend using PowerShell ISE as you can save/document your steps along the way. Whichever one you choose, open it with an elevated prompt, and type the following cmdlets in the order shown.
Set-executionpolicy -executionpolicy unrestricted
Install-Module -Name Microsoft.RDInfra.RDPowerShell -Force
Import-Module -Name Microsoft.RDInfra.RDPowerShell
Install-Module -Name Az -AllowClobber -Force
Import-Module -Name Az -AllowClobber
Notes:
-
When prompted by the Set-executionpolicy cmdlets, answer “Yes” or “Yes to All” to confirm
-
You will see many packages being unzipped when initiating the Install-Module commands.
-
If you only wish to allow running scripts in this one PowerShell Session, you can use the command Set-ExecutionPolicy Bypass -scope Process -Force instead of the first line above.
-
Complete all of the remaining PowerShell steps in this lesson using the same elevated PowerShell session. If you disconnect at any point, open PowerShell once again using an elevated prompt.
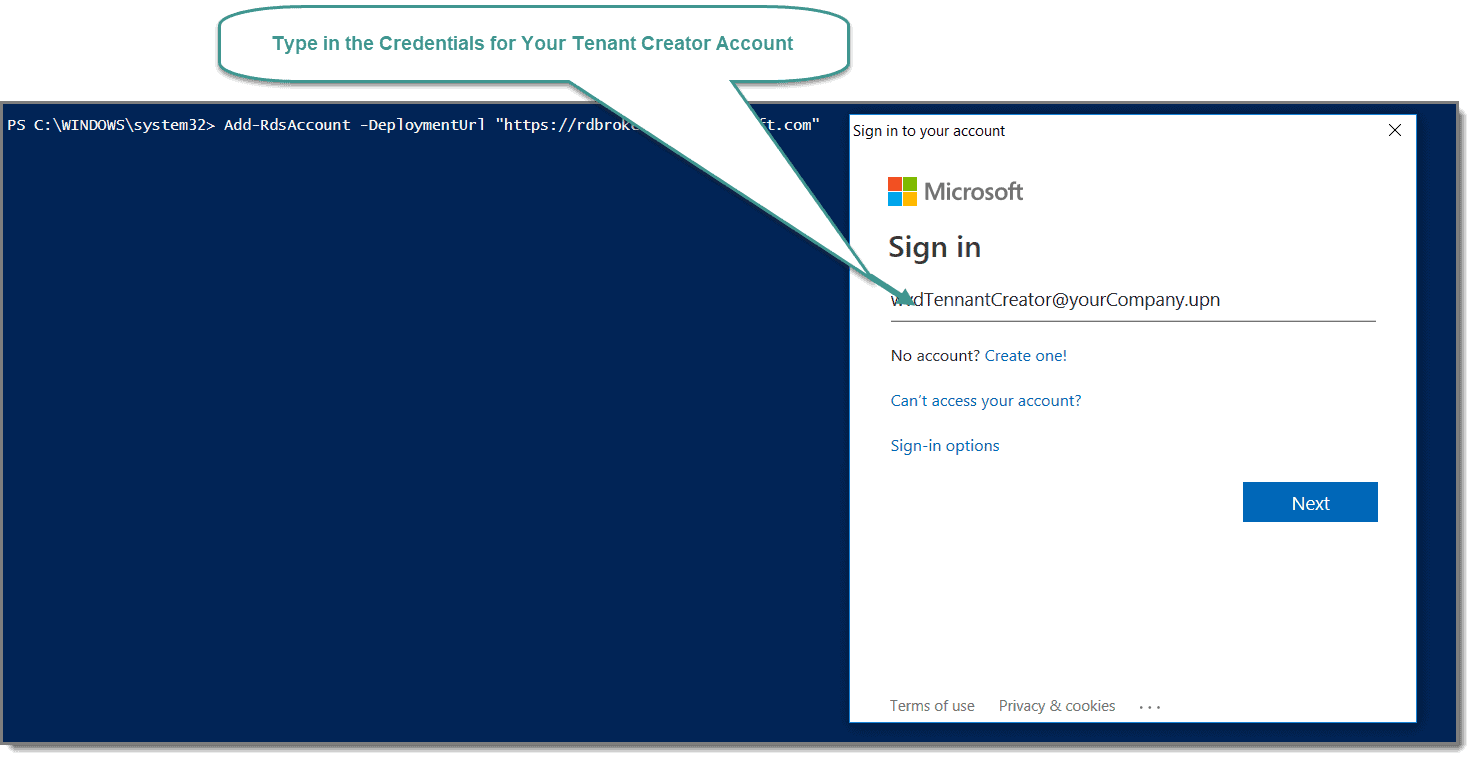
Step 3: Connect to Azure
Once the required modules from the above have successfully installed, you need to run the following cmdlet to connect to Azure.
Add-RdsAccount -DeploymentUrl "https://rdbroker.wvd.microsoft.com"
That command opens up a Windows popup in which you type in the credentials of your Tenant Creator account.
Setting Up Windows Virtual Desktop Tenant
Step 1: How to Create Windows Virtual Desktop Tenant
Now it’s time to run a command to create your Windows Virtual Desktop tenant. You need to use the Active Directory tenant ID (or Directory ID), and Subscription ID you saved earlier. The RDSTenant name should be the name of the tenant you are creating, the AadTenantId string should match the tenant Id string from your Azure portal, and the AzureSubscriptionId string should match the Subscription Id string from your Azure portal.
For Example:
New-RdsTenant -Name CompanyWVDtenant -AadTenantId a1b2c3abaa-6f7a-bc3d4-b95c-a1b2c3d4 -AzureSubscriptionId a1b2c3d4-5bef-1234-abcd-a1b2c3abaa
Note: The entire command should be on one line. You can copy and paste the command above into NotePad and then edit accordingly.
Any time you see “CompanyWVDtenant” in a script, you need to change this value to the correct name of your tenant. I am just using this value for this example.
Once you issue the command, you will see something like this:

Step 2: RDS Owner
Note:
You can use the TenantCreator account from the steps above or choose a different user account if you like, and “-TenantGroupName” is ALWAYS “Default Tenant Group.” Once again, the entire command should be on one line.
For example:
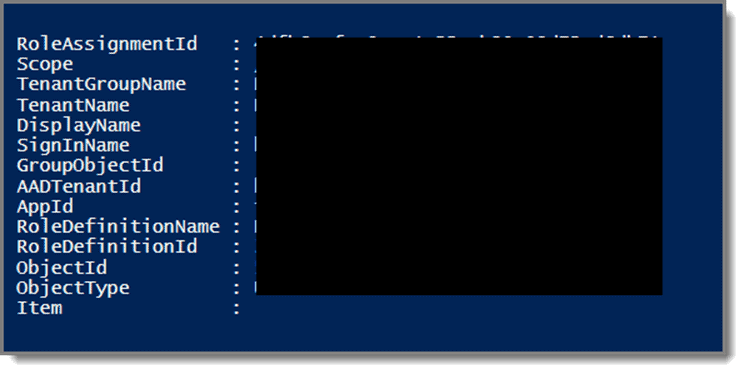
New-RdsRoleAssignment -RoleDefinitionName "RDS Owner" -UserPrincipalName [email protected] -TenantGroupName "Default Tenant Group" -TenantName CompanyWVDtenant
After hitting Enter, you will see something like this.
Step 3: Create Your Host Pools
Host pools are collections of one or more virtual machines. The machines are identical.
In my example, I will create two host pools. One for the “Desktop Application Group” and a second one for the “Remote Application Group”.
To keep things simple, host pool1 will only have full desktops, and host pool2 will only have published applications. To create the host pools, run the following cmdlets after changing “CompanyWVDtenant” to the correct tenant name for your organization.
Note that the commands are on two separate lines.
New-RdsHostPool -TenantName CompanyWVDtenant -name “WVD-Host-Pool01"
New-RdsHostPool -TenantName CompanyWVDtenant -name “WVD-Host-Pool02"
Step 4: Create Desktop and Remote Application Groups
Run the cmdlets below to create the “Desktop Application Group on host pool1, and “Remote Application Group” on host pool2.
Once again, change “CompanyWVDtenant” to the correct tenant name for your organization.
New-RdsAppGroup -TenantName CompanyWVDtenant -HostPoolName WVD-Host-Pool01 -AppGroupName “Desktop Application Group”
New-RdsAppGroup -TenantName CompanyWVDtenant -HostPoolName WVD-Host-Pool02 -AppGroupName “Remote Application Group”
CONGRATULATIONS! You did it. You completed the necessary PowerShell Scripts. Now that wasn’t too bad, was it?
Note that any VMs you create will need to be domain-joined. That means you must have an Active Directory domain controller already in place for these VMs to join. The domain controller should also be configured with Azure AD Connect and have at least one user account synced to Azure AD. You should also have a Point-to-Site VPN already set up in Azure.
If you have no idea what any of that means, then… don’t panic! That’s what the next few sections are about.
However, if you do know what this means, and you know you already have all these prerequisites in place then, perhaps you can skip the next couple of lessons and start creating the WVD’s themselves.
So, we’ll assume you want to create the necessary DC and put together the other required components together in the next section.
» PRO TIP: Reduce Number of GPOs in WVD
Part 4: Configuring Your DC and VMs
In this portion of our WVD series, we create a DC in Azure. Yep! You’re going to create a real “on-prem” Domain Controller … except it’s going to live in Azure and not in your datacenter.
So, even if you don’t end up using WVD anytime soon, this “How to” article may still be super valuable to you.
For those who still keep their AD infrastructure on-prem, there are some great benefits to putting a DC in the Azure cloud. By replicating AD from your on-prem environment, you add resiliency and flexibility to your architecture. You can choose to load balance authentication traffic or direct it all to the cloud if your on-prem network is down.
Let’s get to the process of creating a virtual DC, one that lives in Azure.
Adding, Creating and Configuring Virtual Machines
Step 1: Add Virtual Machines
In the Azure Portal, select “Virtual Machines” from the left side of the screen, then click “Add.”

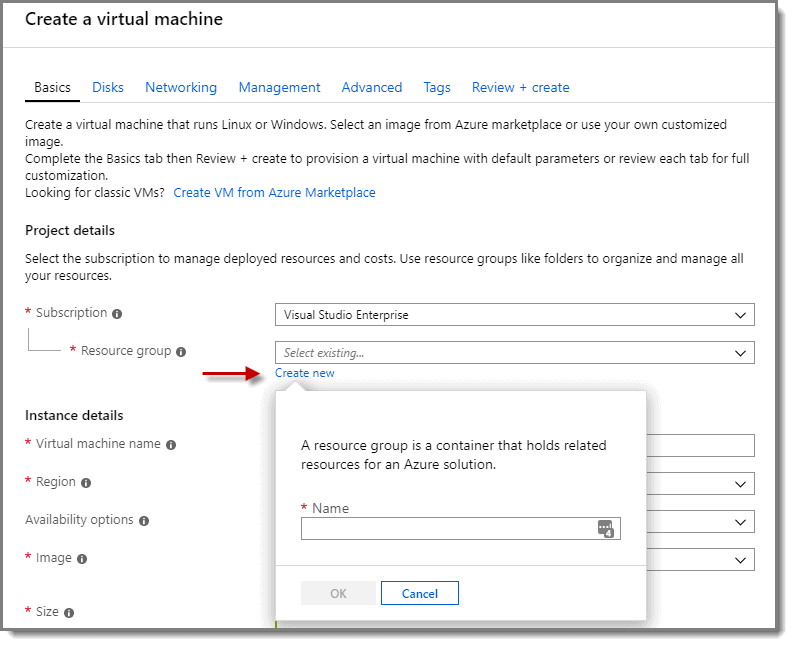
Step 2: Create Virtual Machines
At the “Create a virtual machine” screen > Subscription > Resource group, click on “Create new” to create a new resource group. Then, give the resource group a descriptive name. Take note of the name as you use the same resource group for your VMs.
Note: If you already have an existing Resource Group that you wish to use, then use that one instead.
Step 3: Create Virtual Machines
Fill out the “Instance Details” section with the name of your VM. In my example, I’ve set the region as East US 2, for the image choose either Windows server 2016 Datacenter or Windows Server 2019 Datacenter, and for the size choose “Standard DS1 v2” if not already selected.
Before clicking OK, see the notes below.

Notes:
- Note: Though VMs can live in any Azure region, their data gets stored in East US 2 – see https://www.microsoft.com/en-us/microsoft-365/blog/2019/03/21/windows-virtual-desktop-public-preview/ for more info).
- You don’t have to choose East US-2 as your region. The key is to select the region that offers the fastest response time for your area. If this were for a production environment, you would want to conduct some speed tests to the regions to determine which one is best.
- Also, note that if you are adding a DC to an existing environment, Server 2019 no longer supports the File Replication Service (FRS). This action may require you to perform an FRS to DFS migration of your AD. You can read more about it at https://techcommunity.microsoft.com/t5/Storage-at-Microsoft/Streamlined-Migration-of-FRS-to-DFSR-SYSVOL/ba-p/425405=
Step 4: Administrator Account
For the Administrator account, you can put whatever you would like. I used “wvdadmin” since I plan to use this same account later for the VMs localadmin account. Next, choose a password that you can easily remember and contains at least 12 characters. For “Public inbound ports,” choose “None.” There is a better way to connect to your VMs in Azure without opening up RDP over the internet that I review later.

Step 5: Save Money
If you already have a Windows license for the OS type you picked above, then you can save money by selecting the “Yes” radio button under the “Save money” option, and checking the “Confirmation” box.

Disk Configuration
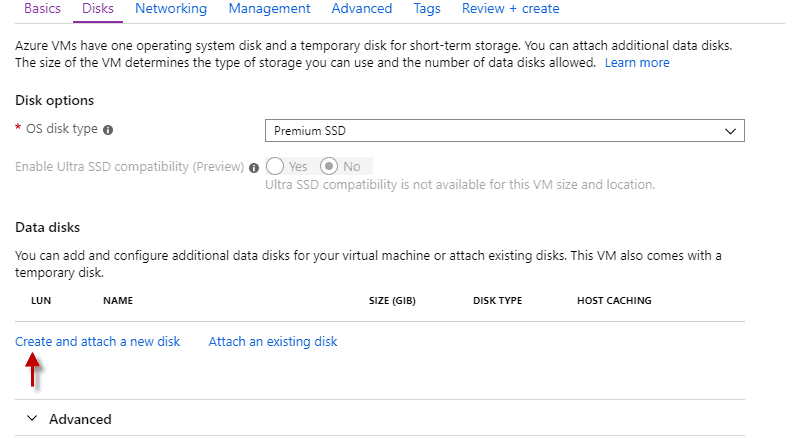
Step 1: Disk Options
Under the Disks option, leave the “OS disk type” at “Premium SSD” and choose “Create and attach a new disk” under the “Data disks” option.
Step 2: Disk Types
At the next screen, choose any “Disk type” you like and then click “OK” at the bottom of the screen.
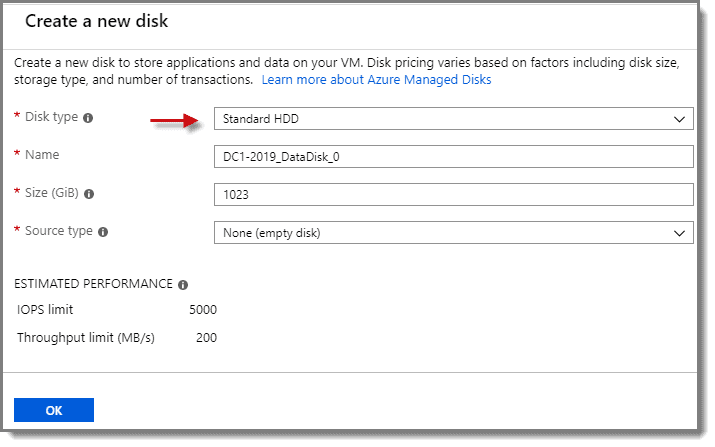
Note: Do not forget that the pricing for your virtual machines is calculated based on the resources that you use. When you are selecting options for storage, processing, and networking components, be aware that the higher the performance or capacity, the more the cost.
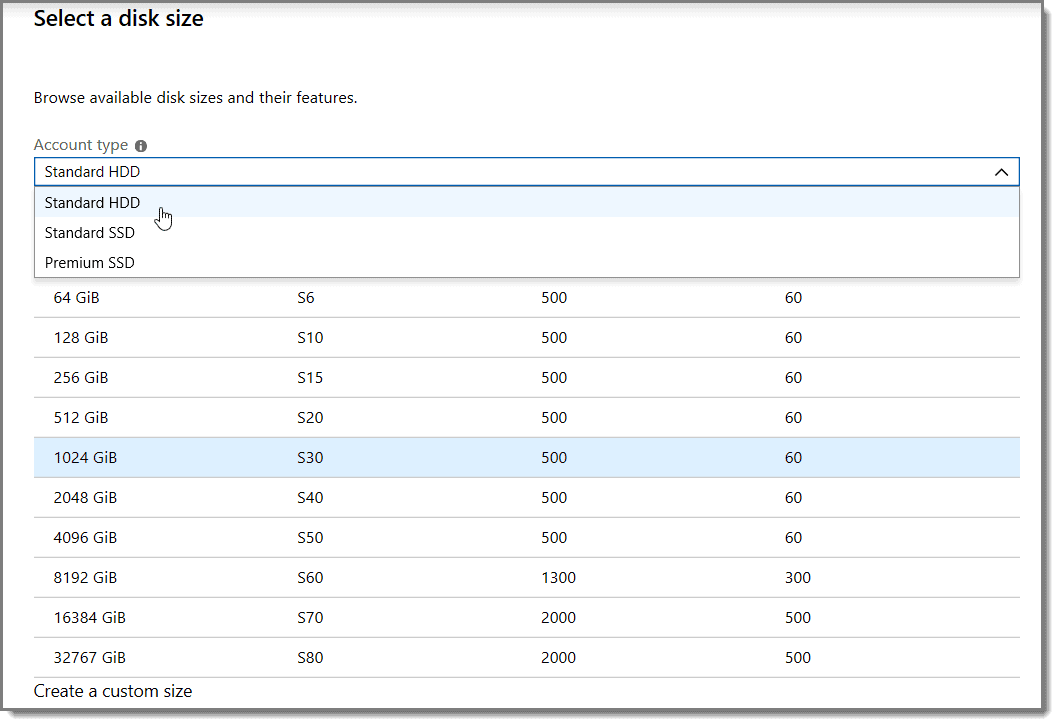
For this WVD demonstration, I have chosen the least expensive options.
Here is an example of the options available when selecting the disk type and capacity, for instance.
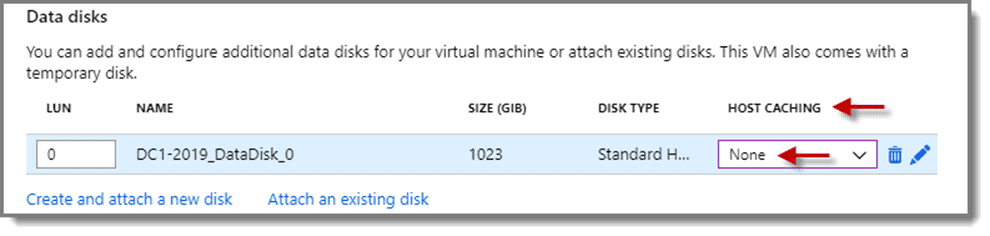
Step 3: Host Caching
At the next screen, make sure that “HOST CACHING” is set to “None” for the data disk.
Network Configuration
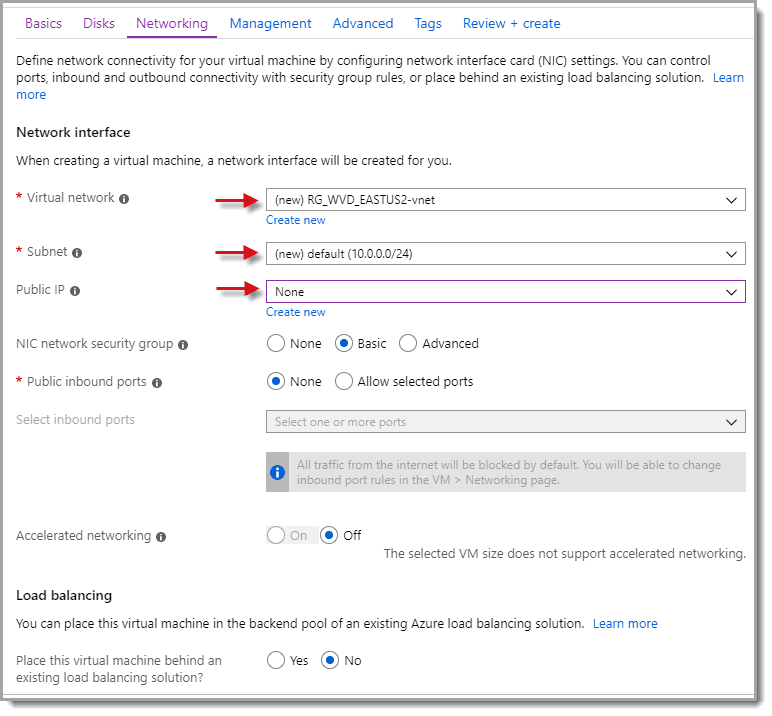
Step 1: Public IP
On the next screen, you can select all of the defaults except for “Public IP.” Set it to “None” and then take note of the “Virtual network” and “Subnet” being created as you will use this information again for the other VMs you create later. There is no need for a Public IP, as we will be accessing our Azure environment through a VPN.
Step 2: Select Timezone
Under the “Management” tab, select the correct Time Zone for your VM and set the default “Shutdown time” and notification if desired. You can also disable the auto-shutdown if you do not wish to use it at this time. Also, take note of the “Diagnostics storage account” being created. Then click “Next: Advanced” at the bottom of the screen.
Note:
Because this is a demo environment, choosing a Shutdown time helps economize the solution because resources costs do not accumulate when the machine is dormant.
Step 3: Review and Create
Skip the “Advanced” and “Tags” screens unless you wish to use them, then go straight to the “Review + create” tab. Verify everything is correct and look for the “Validation passed at the top of the screen. If there is a screen checkbox, then you are good to go. Click “Create,” then wait for the deployment to finish.
Step 4: Go to VM
Once the deployment is successful, click on the “Go to resource” button to go to your newly created VM.

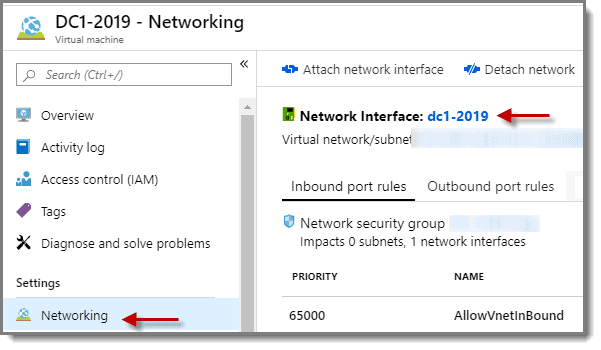
Step 5: Networking
Now select “Networking” and click on the name of the “Network Interface.”
Step 6: IP Configurations
Then select “IP configurations” and click on the name of the “IP Configuration shown on the right of the screen.

Step 7: Change Dynamic to Static
Change the “Assignment” from “Dynamic” to “Static” under the “Private IP address settings” and click “Save.” Note that static addressing in Azure does not imply a person manually assigning an address. It merely reserves the first address assigned by the DHCP, so do not change the IP address to another value.

Step 8: Virtual Network/Subnet
Once the changes save, click on the “Virtual network/subnet” in blue text.

Step 9: DNS Server
Of course, we are going to need a DNS server reference for our environment. Select “DNS servers” and choose the “Custom” radio button. Then, add the static IP for the VM you just created (in my case, that would be 10.0.0.4). Next, add a second DNS Server entry for any public DNS server on the internet. I chose 8.8.8.8 for one of Google’s public DNS servers. It allows the VM to have internet access while installing updates and promoting it to a domain controller. Also, it sets the DNS server in advance for any VM you create later. When done, click “Save” to save your changes.

Step 10: Address Space
Next select “Address space” then on the righthand side of the screen change 10.0.0.0/24 to 10.0.0.0/16 and click save

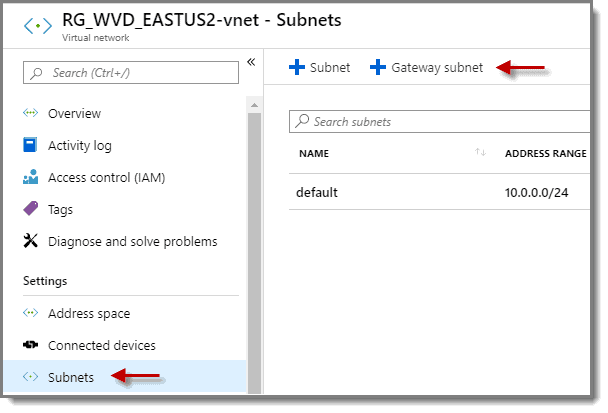
Step 11: Subnets
Now select “Subnets” and click on the “Gateway subnet” on the righthand side of the screen.
Step 12: Edit Settings
Edit the settings, so they look like below, and then click “OK”.

Note: If you cannot add the address range, try refreshing the page in the browser then try again.
More info:
- Virtual network address space: 10.0.0.0/16 (10.0.0.0 – 10.0.255.255)
- Default subnet: 10.0.0.0/24 (10.0.0.0 – 10.0.0.255)
- Gateway subnet: 10.0.1.0/24 (10.0.1.0 – 10.0.1.255)
We have now completed the creation of our first Azure server, which becomes our Domain Controller. But, we cannot access it securely. We could get to it insecurely, but that’s not a great idea as 1) being public-facing and 2) insecure (even for a moment), isn’t such a hot idea.
So, hang tight.
We’ll get to connecting to and manipulating the VM, which will be your DC… after we’ve secured our connection, which is coming up.
Of course, it is not a DC yet. We have yet to install the domain server roles and promote the server to a DC. However, all in good time.
Before we create an AD database, we need to secure our environment to keep out the bad guys. That means we need to create a Point to Site VPN, which is what we will do later in this guide.
» Simplify Browser Management in WVD: Learn More
Part 5: Setting Up Your VPN
Whether you are accessing your WVD machine from your on-prem network, or your laptop at a remote site on the road, you want secure, encrypted connections.
Security is especially important if you are replicating AD traffic between your on-prem DC’s and the one you just created in Azure. In this installment of our series on WVD, we create and configure the VPN connection to secure our network transmission.
VPN Configuration
Step 1: Point to Site VPN
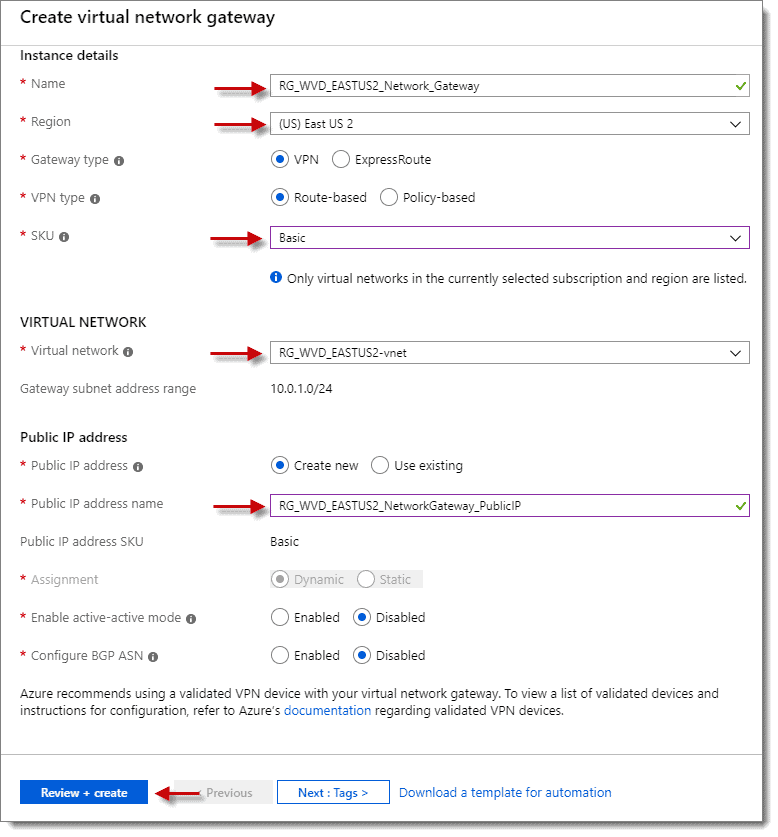
First, we need to set up a Point to Site VPN connection so we can manage the VM(s) without having to enable RDP over the public internet. To do this, first, use the “Search” in the Azure portal to search for “virtual network gateway,” then click on “Virtual network gateways” found in the results. Next, click on “Add” or “Create a virtual network gateway” to continue.

Step 2: Create Virtual Network Gateway
At the “Create virtual network gateway” screen, fill out the values for your environment using the below as a guide, then click on “Review + create.”
Step 3: Confirm Validation
Again, if you see the green checkmark with the message “Validation passed” at the top left of the screen, then you are good to go. Next, click on “Create “at the bottom of the screen.
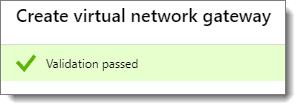
Note: This deployment takes longer to complete than any of the previous steps. Plan on at least 30 minutes for it to finish. It would be a good time now to step away and take a break.
Resources, Certificates, and Other Configurations
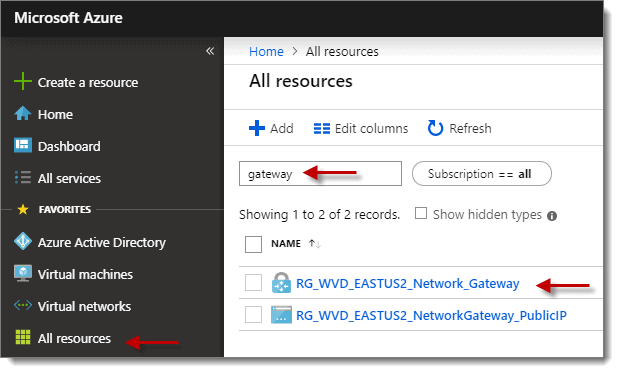
Step 4: Add Resources
Once the deployment is successful, click on the “Go to resource” button if available, if not then select “All resources” from the left column in the portal and then click on the network gateway name you created in the previous step. If you have many resources, it may help to use the filter.
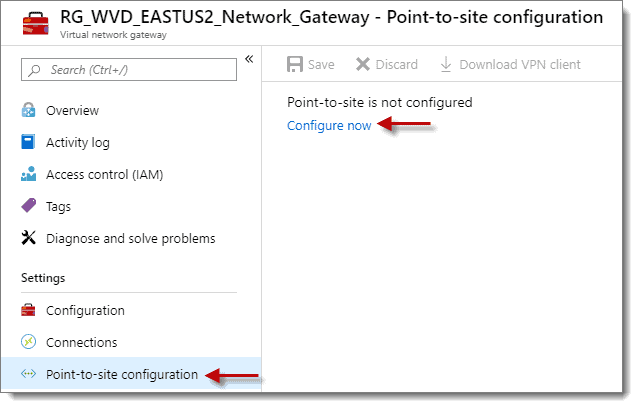
Step 5: Point-to-site Configurations
At the next screen, click on “Point-to-site-configuration under “Settings” then click the “Configure now” link on the right-hand side of the screen.
Step 6: Address Pool
For the “Address Pool” enter any private internet range (i.e., 172.16.0.0/24) that is not present in your Azure Virtual Network range (if you followed my steps correctly, then do not use anything within 10.0.0.0/16 (10.0.0.0 – 10.0.255.255), then click “Save.” Regardless of which network address, remember to go back to your Virtual Network and add it in as an additional address space. You may want to draw out your IP configuration on paper to get a mental picture of how it is all connected.
Step 7: Create Root and Client Certificates
OK, now it is time to use PowerShell again, which shouldn’t be any big deal now. You need to create the Root and Client certificates for the Point-to-Site-configuration, as they get used for the encryption. From an elevated PowerShell (or PowerShell ISE) session, run the two scripts below. This procedure creates the root and client certificates needed for the P2S connection under “Current User > Personal > Certificates.”
Here is the one for the root cert:
#Root cert:
$cert = New-SelfSignedCertificate -Type Custom -KeySpec Signature `
-Subject "CN=P2SRootCert" -KeyExportPolicy Exportable `
-HashAlgorithm sha256 -KeyLength 2048 `
-CertStoreLocation "Cert:\CurrentUser\My" -KeyUsageProperty Sign -KeyUsage CertSign
Here is the one for the client cert:
#client cert:
New-SelfSignedCertificate -Type Custom -DnsName P2SChildCert -KeySpec Signature `
-Subject "CN=P2SChildCert" -KeyExportPolicy Exportable `
-HashAlgorithm sha256 -KeyLength 2048 `
-CertStoreLocation "Cert:\CurrentUser\My" `
-Signer $cert -TextExtension @("2.5.29.37={text}1.3.6.1.5.5.7.3.2")
Notes:
- Find more info and the original PowerShell scripts at https://docs.microsoft.com/en-us/azure/vpn-gateway/vpn-gateway-certificates-point-to-site
- If you have an existing firewall protecting at the perimeter of your on-prem environment, you can create a site-to-site VPN connection using the interface of your firewall appliance. In this demo, we are merely using a point-to-site connection.
Step 8: Create Root and Client Certificates
In the same PowerShell session above, run “certmgr” to open Certificate Manager in the current user scope. Expand “Current User > Personal > Certificates”.

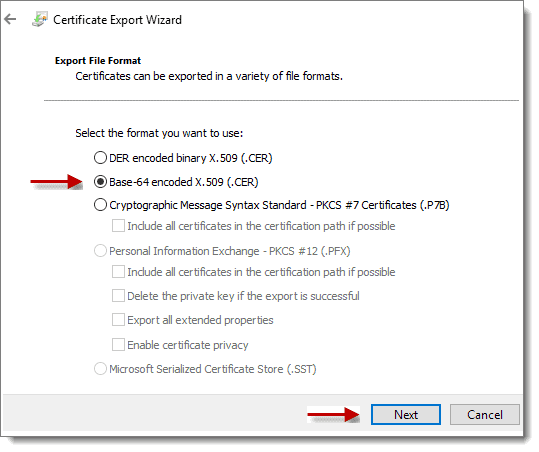
Step 9: P2SRootCert
Right-click on the P2SRootCert and choose “All Tasks” > “Export…” and click “Next” to continue. Now click “Next” again (stick with the default of not exporting Private Key), select the “Base-64 encoded X.509 (.CER)” radio button, and click Next once more.
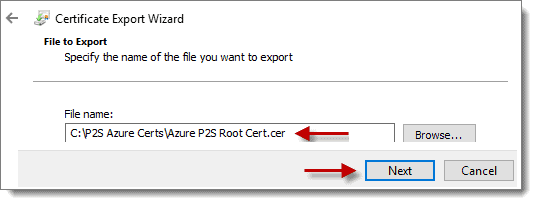
Step 10: Save Certificate
Click “Browse…” and choose a location to save the file. Remember to give the file a descriptive name with “.CER” as the extension, then click “Next,” then “Finish” to export the certificate.
Step 11: Copy Certificate Text
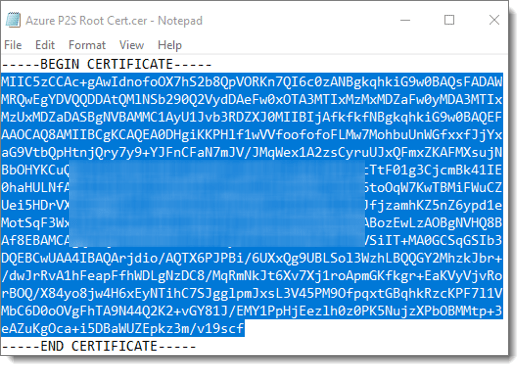
Browse to the certificate and then open the certificate using Notepad (right-click > Open With > Notepad). Highlight the text between “—–BEGIN CERTIFICATE—–” and “—–END CERTIFICATE—–” then copy that text to the clipboard (CTRL+C).
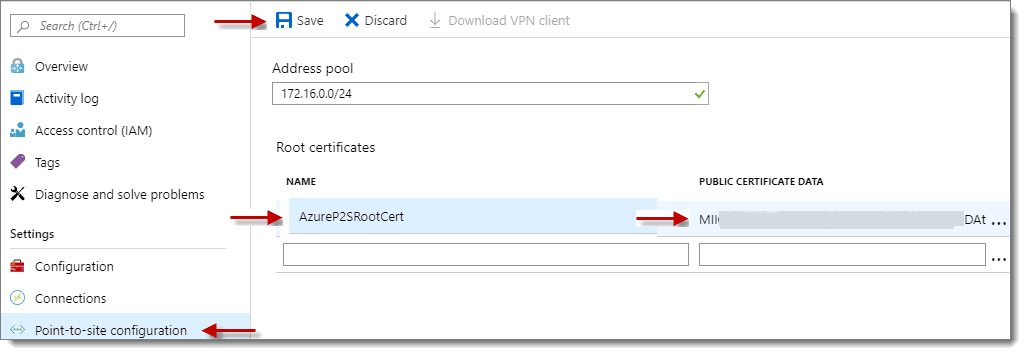
Step 12: Add Name
Back in the Azure Portal, under the “Point-to-site-configuration” > “Root certificates,” add a descriptive name under the “NAME” field. Then, paste (CTRL+V) the text you copied from Notepad into the “PUBLIC CERTIFICATE DATA” field on the right. Finally, click anywhere off the field so that the “Save” option becomes available. Last but not least, click “Save.”
Installing and Connecting Your VPN
Step 1: Download VPN Client
After the changes get saved, the option to “Download VPN Client” becomes available. Download the VPN client package and take note of where the zip gets saved as you need to extract and run the relevant VPN executable for your client OS later.

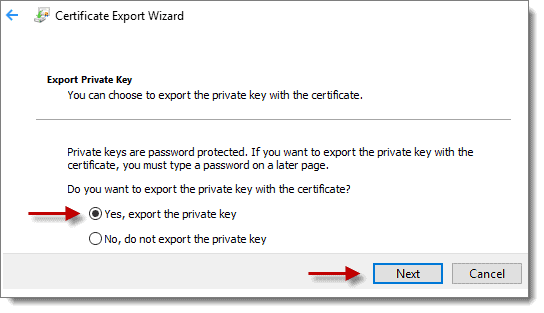
Step 2: Export Point-to-Site Client Certificate
Next, we need to export the Point-to-Site Client certificate. We do this in case we need to install the certificate on another machine. Using the computer from which you exported the Point-to-Site Root certificate, reopen “Certificate Manager” by running “certmgr” in your PowerShell session. Then, expand “Current User > Personal > Certificates.” Now right-click on “PS2ChildCert” and choose “All Tasks” > “Export…”, then click “Next” to continue, this time make sure the option “Yes, export the private key” is selected, then click “Next.”
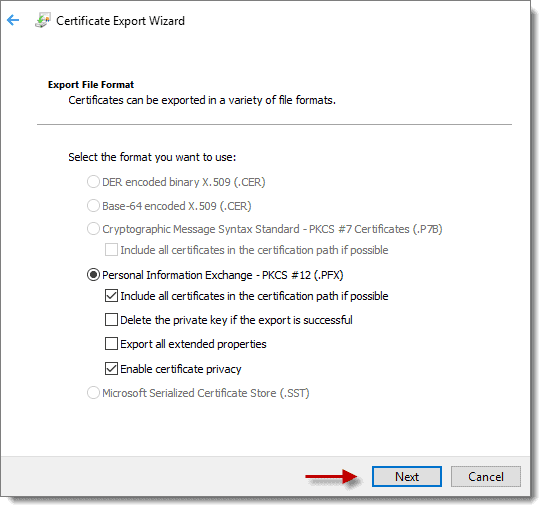
Step 3: Export Point-to-Site Client Certificate
The default format should already be “.PFX.” If your screen matches the one below, then click next.
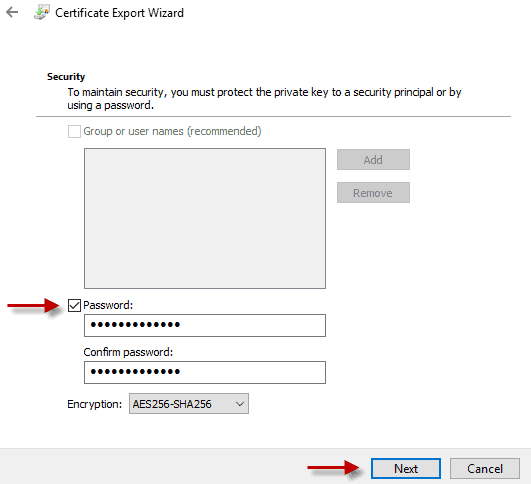
Step 4: Password
At the “Security” screen, place a checkbox in the “Password” box and type in a password to secure the private key. Change the encryption level if desired before clicking “Next.” Take special note of this password, as you need it every time you need to install this client certificate for a new user.
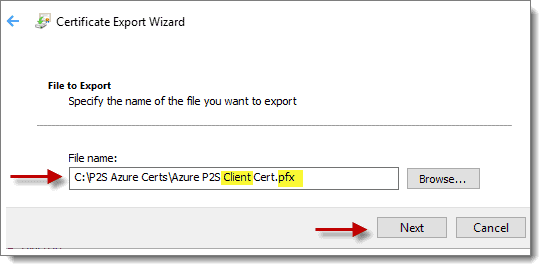
Step 5: Finish Certificate Export
At the “File to Export” screen, click “Browse…” and choose a location to save the file. Remember to give the file a descriptive name with “.PFX” as the extension and click “Next,” and then “Finish” to export the certificate.
Step 6: P2SRootCert (Optional)
Optional: It’s an excellent time to repeat the process above for the “P2SRootCert” so that you also have a “PFX” version of the certificate that includes the private key.
Step 7: Install VPN Client
Now, on your Windows client machine where you have been performing all the steps above, extract the VPN Client Zip you downloaded earlier. Then, install the VPN Client version that matches your client OS (remember to run the install as Administrator). Since you have already installed the P2S Client certificate, you don’t have to install the client certificate this time around. However, if you don’t have the P2S Client certificate installed, you need to double-click the Client certificate (while logged in as the user who needs to use the VPN) and enter the password for the P2S Client Certificate private key. At this point, you can install the VPN.
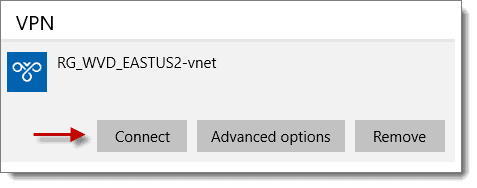
Step 8: Connect to VPN
-
- Connect to the VPN from your client PC by clicking the network icon on the bottom right of your taskbar and select the VPN connection.

-
- At the VPN Settings screen, again click the name of the VPN connection, and then click “Connect.”
-
- Now click “Connect” at the screen below, then click continue on the message that pops up asking for permission to update your routing table.
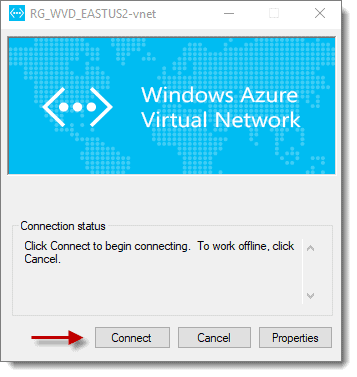
-
- As your final task in this exercise, click “Yes” on any UAC prompts if presented.

You’re Now Connected to Azure!
Congratulations, you just connected to Azure via the Point-to-Site VPN. If you are like most networking professionals, your first instinct will be to ping the VM you created in the previous installment to test the connection. Don’t freak out if you can’t ping it. You probably won’t be able to due to the default local firewall settings. You will, however, be able to remote desktop to it. Launch MSTSC from the run command on your client machine and then enter the IP address of the VM you wish to connect to (i.e., 10.0.0.4). Then login with the local admin credentials you assigned earlier. If you cannot remember the password, do not panic. You can reset the password under the properties of the Virtual Machine in the Azure portal under the “Support + Troubleshooting” section, then the “Reset password” option.
You have now created a secure connection between you and your Azure environment. You are now fully engaged in cloud computing, Azure style. Now that we can access the server we created, it’s time to configure it as we need it, which happens what we do in the next part
» PRO TIP: Elevate Installation of Remote Desktop Apps in WVD
Part 6: Completing Your Configuration
Configuring and Connecting Your Domain Controller
Now that you have your virtual server in a secure environment now, we can make it a Domain Controller and then connect it to Azure.
We are almost in the home stretch here, as this is the next to last installment in the series. One more to go after this one!
As in most things in life, there is more to implementing a WVD environment than you initially though probably. We are almost there, so keep plugging.
Step 1: Connect to Domain Controller
First, let’s get connected to the Domain Controller you created. If you remember, you set up the Point-to-Site VPN that allows you to access your Azure machines remotely. Before you can remote desktop to your DC in Azure, you need to launch the Azure VPN Client and wait for it to connect successfully. Once the VPN is connected, you can use Remote Desktop to connect to your DC in Azure via its IP Address (10.0.0.4 in our example).
Step 2: Perform Customizations
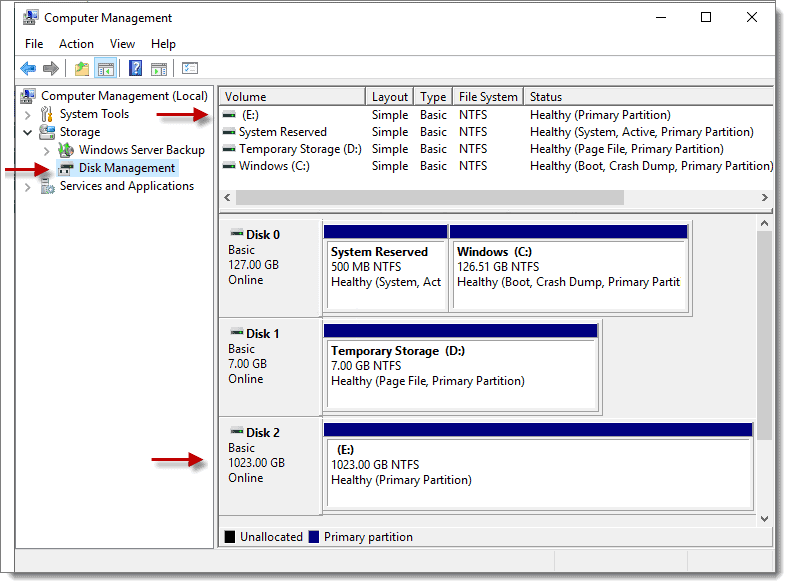
Perform any additional customizations to the OS (i.e., install updates, set correct Time Zone, launch Computer Management > Storage > Disk Management and add the available disk as “E:”
Step 3: Connect to Domain Controller
Reminder: Drive E: was the data disk we created to store the Logs, Database, and Sysvol for Active Directory; this is the first time logging into the server, so we need to set up Drive E: using Disk Manager in Step 2 above.
TIP: Azure implements write caching on the OS disk of virtual machines. This procedure can cause issues for databases such as Active Directory, and lead to data corruption. To avoid this, use a data disk with write caching disabled on the VM and use this drive to store the AD DS database, Logs, and SYSVOL folders.
Then take the time to doublecheck to make sure that the computer name is correct and tweak any other settings you may want. Then install the “Active Directory Domain Services role” and reboot.
Step 4: Check VM Status
After rebooting, check the status of the VM in the Azure portal to know when it’s available, as that is the only real way since it is in the cloud. Verify that the data disk shows up as drive E: then launch server manager to finish the process of promoting the VM to a domain controller with one crucial caveat, make sure you use the E: drive for the following options.

More info:
Azure implements write caching on the OS disk of virtual machines. This procedure can cause issues for databases such as Active Directory, and lead to data corruption. To avoid this, use a data disk with write caching disabled on the VM and use this drive to store the AD DS database, Logs, and SYSVOL folders.
Syncing Azure AD
Step 1: Download and Sync AD Connector
Once the VM has been promoted successfully to a domain controller, it’s time to download the AD Connector and set up synchronization from your newly created traditional AD domain controller to Azure AD.
This operation is a little weird because you usually would use the AD connector to sync your real-on prem AD to Azure AD. And in this case, in this demonstration, we have a traditional DC which isn’t on-prem, it’s in Azure. So.. yeah. You’re syncing “Traditional AD to Azure AD” even though the traditional AD is already in azure. Mindbender.
Again, if you already have an on-prem AD that you want to sync to Azure AD, you can do it, but don’t email us if something goes wrong.
You can find the download for the AD Connector at either of the links below:
- Within your Azure Portal here: https://portal.azure.com/#blade/Microsoft_AAD_IAM/ActiveDirectoryMenuBlade/AzureADConnect
- Download directly at Microsoft from here: https://www.microsoft.com/en-us/download/confirmation.aspx?id=47594
Step 2: Set Up New OU
Before installing the AD connector on your DC, I recommend that you first set up a new OU with some user accounts that you would like to sync to Azure AD.

These are the accounts assigned Windows Virtual Desktop resources later. For demonstration purposes, I have created an OU called “WVD” and a sub-OU called “WVD Users” and added a few users under this OU.
Note: The email addresses of the users above match the UPN of my Azure AD Domain.
Step 3: Install AD Connector
When ready, install the AD connector.
-
- Accept the license agreement, then click continue.

-
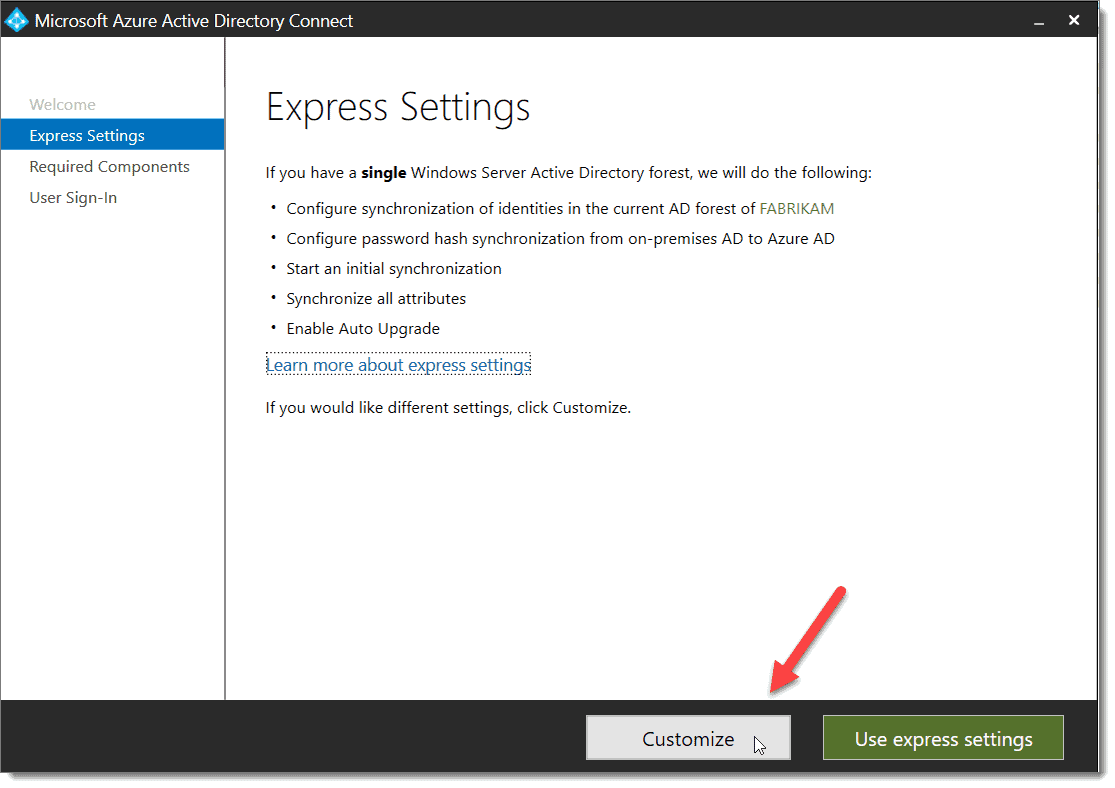
- At the “Express Settings” screen, choose “Customize.”
-
- At the “Install required components” screen, click “Install.”
- At the “User sign-in” screen, click “Next.”
- At the “Connect to Azure AD” screen, enter your Global Administrator credentials for Azure and then click “Next.”
- At the “Connect your directories” screen, click the “Add Directory” button.
- At the “AD forest account” screen, select “Use an existing account,” provide Enterprise Admin credentials for your AD domain, then click “Ok,” and then “Next.”
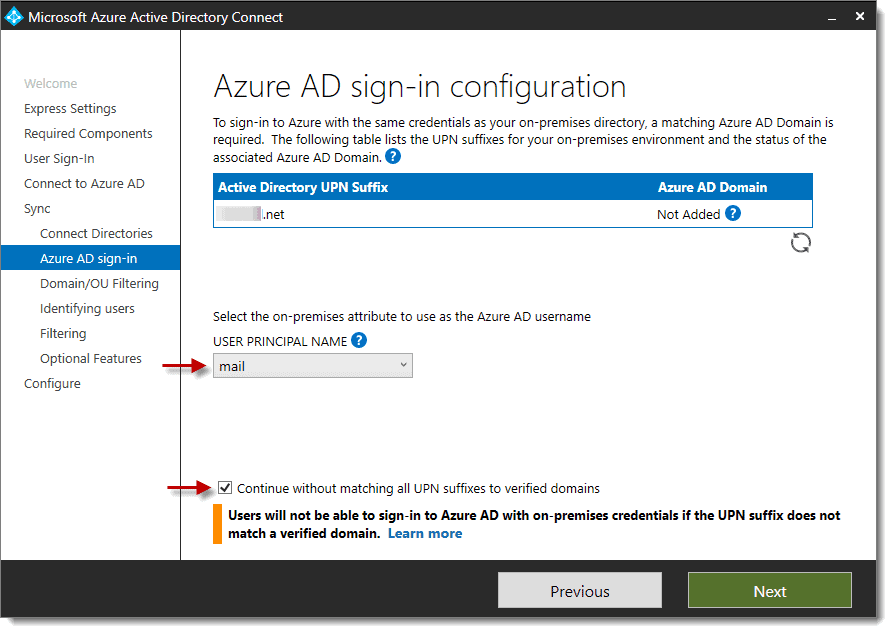
- At the “Azure AD sign-in configuration” screen, use the drop-down and select “mail” instead to use for the on-premises attribute, then check the box for “Continue without matching all UPN suffixes to verified domains,” then click “Next.”</li
-
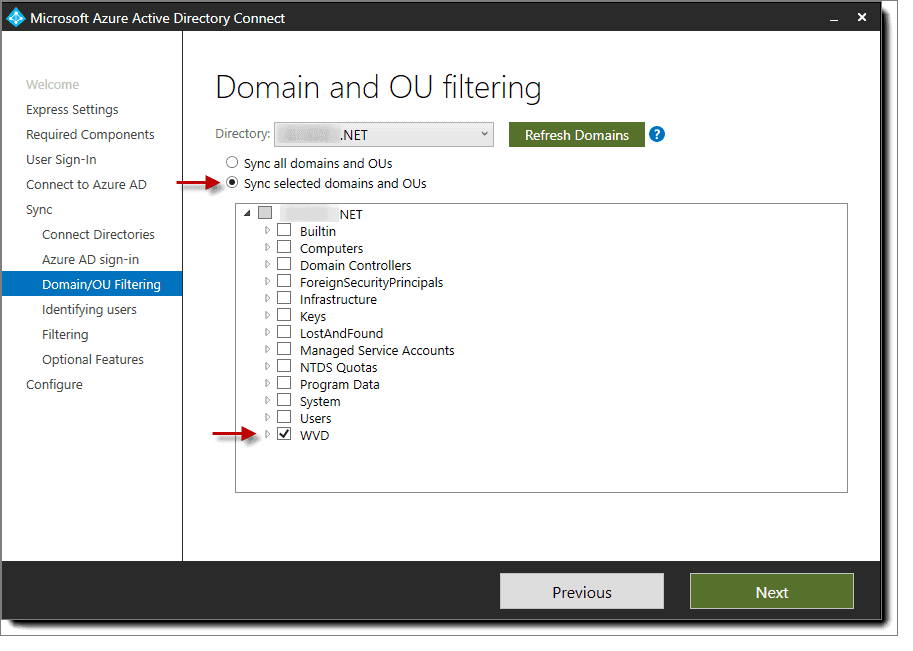
- At the “Domain and OU filtering” screen, choose the radio button for “Sync selected domains and OUs,” then select only the OU you wish to sync to Azure AD, then click “Next.”
-
- At the “Uniquely identifying your users” screen, if you only have one AD directory to be synced to Azure AD, then stick with the defaults and click “Next,” otherwise choose the second radio button “User identities exist across multiple directories. Match using: Mail attribute”, then click “Next.”
- At the “Filter users and devices” screen, click “Next.”
- At the “Optional features” screen, click “Next.”
- At the “Ready to configure” screen, click “Install.”
- At the “Configuration complete” screen click “Exit,” you are now done with the AD Connector setup.
- Wait a few minutes, then check in Azure AD to ensure your users synced from the AD domain.

Add VMs and Deploy to Azure
Step 1: Add WVD VMS Set Up New OU
So now, it is finally time to add the Windows Virtual Desktop VMs. There are at least three different ways to do this.
-
- Choose the create a Windows Virtual Desktop – Provision a host pool option from the Azure Marketplace
- Use PowerShell
- Use the Azure Resource Manager template for provisioning a new host pool.
- In my opinion, the third option is the best, so I will focus on it and explain how to deploy WVD VMs using the Azure Resource Manager template.
Step 2: Deploy to Azure
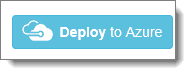
First, visit this link: https://github.com/Azure/RDS-Templates/tree/master/wvd-templates/Create%20and%20provision%20WVD%20host%20pool then scroll to the bottom of the page and click the “Deploy to Azure” button at the bottom left-hand corner of the page.
It looks like this:
Step 3: Deploy to Azure
Clicking the “Deploy to Azure” button takes you to here: https://portal.azure.com/#create/Microsoft.Template/uri/https%3A%2F%2Fraw.githubusercontent.com%2FAzure%2FRDS-Templates%2Fmaster%2Fwvd-templates%2FCreate%20and%20provision%20WVD%20host%20pool%2FmainTemplate.json
More info:
https://docs.microsoft.com/en-us/azure/virtual-desktop/create-host-pools-azure-marketplace
Step 4: Select Resource Group
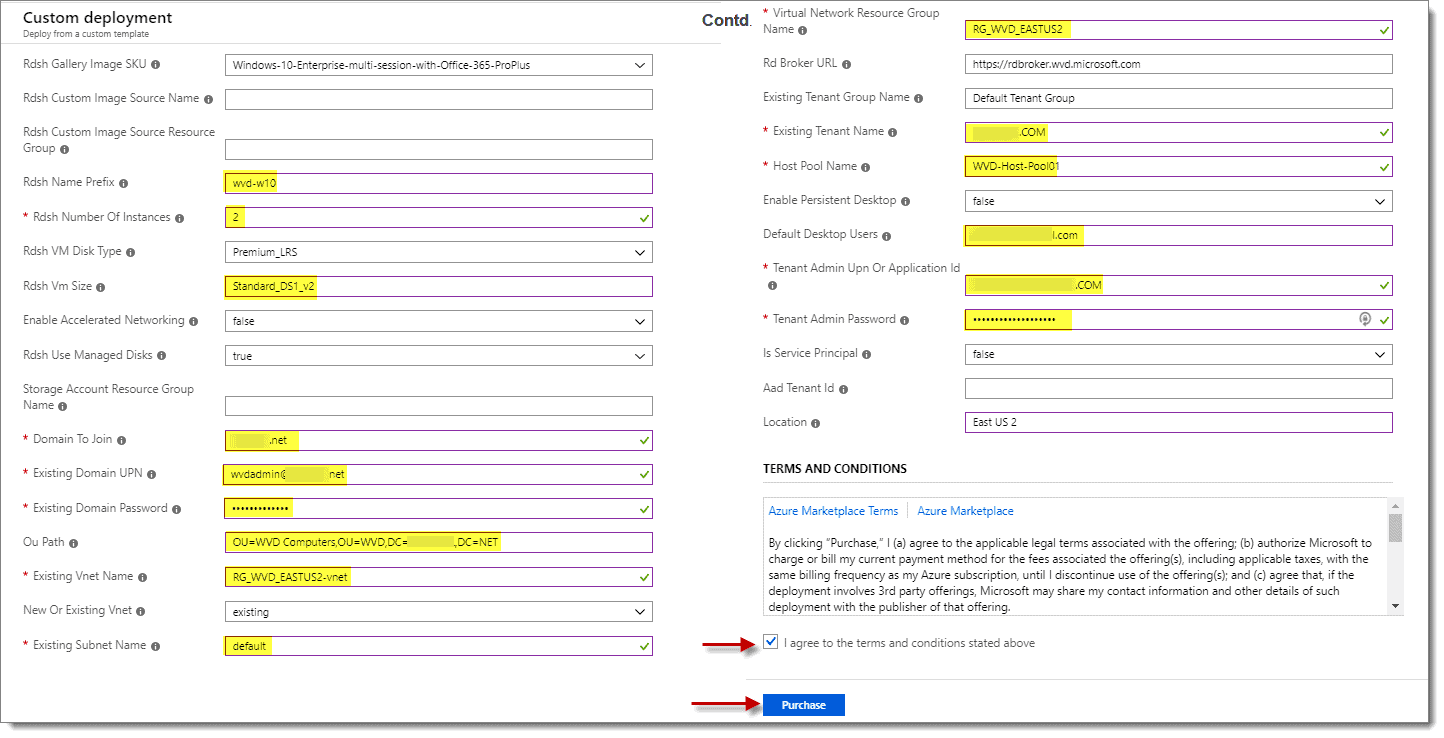
At the “Custom Deployment” screen under the “Basics” section for “Resource group,” select the resource group you created under step #23 above.

Step 5: Miscellaneous Configurations
At the “Custom Deployment” screen under the “Settings” section fill out the following items below:
- Rdsh Name Prefix (Base name of VMs you wish to use since these VMs are to be Windows 10 full desktops – I used “wvd-w10”)
- Rdsh Number Of Instances (How many VMs you wish to have created, -01,-02,-03 and so on will be added to the name)
- Rdsh VM Size (Recommend going with something not too pricey – Standard_DS1_v2 etc.)
- Domain To Join (FQDN of the domain that VMs are to be joined to)
- Existing Domain UPN (Username in the domain that can join machines to the domain in UPN format)
- Existing Domain Password (Password for the username above – should be at least 12 characters long)
- OU Path (Optional – specify the OU where you want the newly created VMs to live)
- Existing Vnet Name (The name of the virtual network you created earlier for the VMs)
- Existing Subnet Name (The name of the subnet the VMs will be placed in)
- Virtual Network Resource Group Name (The name of the resource group containing the virtual network)
- Existing Tenant Name (The name you gave your WVD tenant)
- Host pool name (this is host pool that you want your VMs to be assigned to since these are full desktops, we use “WVD-Host-Pool01.”
- Default Desktop Users (Any user(s) that you wish to be able to access desktops in this host pool – UPN should match Azure domain UPN suffix)
- Tenant Admin UPN or Application Id (This needs to be an account in UPN format that has RDS Owner role assigned)
- Tenant Admin Password (Password for the Tenant Admin account – should be at least 12 characters long)
Step 6: Agree to Terms and Conditions
When ready, check the box next to “I agree to the terms and conditions above,” then click “Purchase.”
Step 7: Repeat Steps 9-13
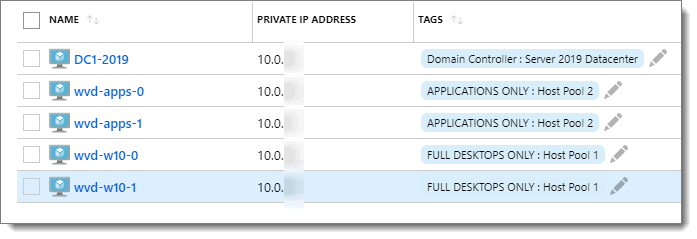
Wait for the deployment to finish; it takes a while. After the deployment is successful, repeat steps #9-13 above, but this time use “wvd-apps” for “Rdsh Name Prefix” and “WVD-Host-Pool02” for the “Host pool name.” This 2nd run creates the two additional VMs used for deploying apps. Once this 2nd deployment is complete, you should have 5 VMs total if you have been following along precisely with my steps. One Windows Server 2016 or 2019 domain controller and 4 Windows 10 session hosts.
Step 8: Connect the Point-to-Site VPN
At this point, you should connect the Point-to-Site VPN for your Azure environment. Use Remote Desktop (MSTSC.EXE) from your machine to connect to each VM by its “Private IP Address” to fine-tune any settings.
You can install any applications you like, which you want in the VMs. We recommend installing the PolicyPak Admin Console MSI on the Domain Controller, and installing the PolicyPak Client Side Extension (CSE) MSI on each of the four client VMs.
If you’re an existing PolicyPak customer, you will find the PolicyPak download at https://portal.policypak.com/downloads.
You can hand-install, or use MS SCCM, PDQ Deploy, or any software distribution method to get the applications installed on your Azure VMs.
You are almost there! Just one more installment of this series to go. Don’t stop now. Roll up your sleeves, and let’s finish this implementation out now.
Think You Know VDI? Think Again
VDI is a powerful way of ensuring you can deliver a normal Windows image to your BYOD users. But it requires careful implementation to ensure that the user experience is optimal, efficient and secure. The whitepaper shows you some of the key points to watch for in setting and delivering your VDI image to your users, and how adding PolicyPak to your toolbox grants you increased control over both the VDI image and the applications within it.
Verify VMs and Assign Users
Completing the WVD Configuration Setup
Pre-Congratulations, you are almost at the finish line! Just 14 more steps to push through. There is just one thing. We have to go back to PowerShell to finish this out. But no worries, take your time, and we’ll have your brand new WVD up and ready for production.
Step 1: Log in to Azure
Our next step is to start up another elevated PowerShell (or PowerShell ISE) session. Run the command below to login to Azure with your Tenant Creator account. Be sure to log in using UPN format like [email protected].
Add-RdsAccount -DeploymentUrl "https://rdbroker.wvd.microsoft.com"
Note: Once you log in, you can run “Get-RDSTenant” to make sure you are connected successfully and to the right tenant.
Step 2: Verify Each VM
Now we are going to verify that each of the virtual machines we deployed above got added to the correct host pools, wvd-w10-0, and wvd-w10-1 should be in WVD-Host-Pool01, and wvd-apps-0 and wvd-apps-1 should be in WVD-Host-Pool02. To verify this, we need to run the commands below in our elevated PowerShell session.
For Example:
Get-RdsSessionHost CompanyWVDtenant WVD-Host-Pool01
Get-RdsSessionHost CompanyWVDtenant WVD-Host-Pool02
The result for each command should look similar to below. When you see the correct host pool name, along with “Status: Available” and “UpdateState: Succeeded,” then you know the VM (Session Host) linked to the correct host pool, and everything should work going forward.

If everything is correct, feel free to skip the text below and move on to the next step.
If for some reason, a VM (Session Host) is missing entirely from any host pool, then you can use the following process below to get the machine added to the correct host pool. For instance, let’s say that wvd-apps-0 is missing from WVD-Host-Pool02. In that case, we first need to create a registration token to use for adding wvd-apps-0 to WVD-Host-Pool02. To generate the token, run the command below in your elevated PowerShell session.
New-RdsRegistrationInfo -TenantName CompanyWVDtenant -HostPoolName WVD-Host-Pool02 | Select-Object -ExpandProperty Token
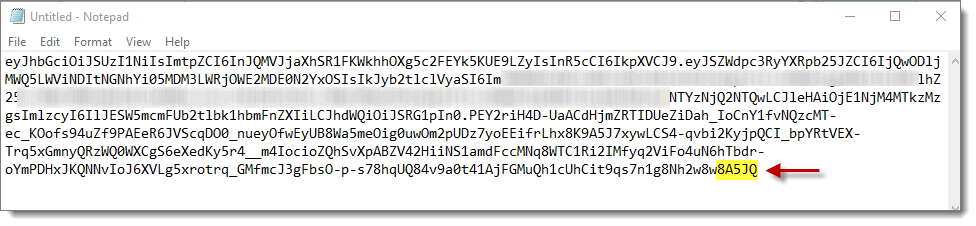
The result should look similar to below. Note: All of the text within the red box is the token, you need to copy that text and save it somewhere safely (i.e., use Notepad) so we can use it later to link the VM (wvd-apps-0) to WVD-Host-Pool02. By default, the token is good for 72 hours.

Note: All the spaces need to be removed from the token text for it to work. If you copy the token text to Notepad and enable word wrap, you see that there are a lot of empty spaces between the lines of text, such as is shown below. Note that this CANNOT work.
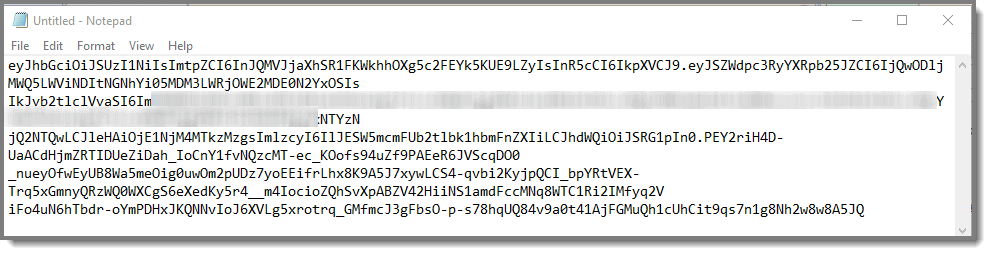
Tip: If you turn off word CANNOT wrap all the text should be on one line with no empty spaces and look like this below.

Now that you have your token, you should use a remote desktop to connect to the VM (wvd-apps-0) to WVD-Host-Pool02. Once you log into the VM as an administrator, visit the two links below. Then, download each of the files to the VM’s desktop. You can also create a text file on the desktop if you wish to store the registration token until you are ready to use it.
Download these two files below:
- Windows Virtual Desktop Agent = https://query.prod.cms.rt.microsoft.com/cms/api/am/binary/RWrmXv
- Windows Virtual Desktop Agent Bootloader = https://query.prod.cms.rt.microsoft.com/cms/api/am/binary/RWrxrH
More info: https://docs.microsoft.com/en-us/azure/virtual-desktop/create-host-pools-powershell#register-the-virtual-machines-to-the-windows-virtual-desktop-preview-host-pool
Install the agent; when you get to the screen below, replace the “INVALID_TOKEN” text with the text from your registration token.
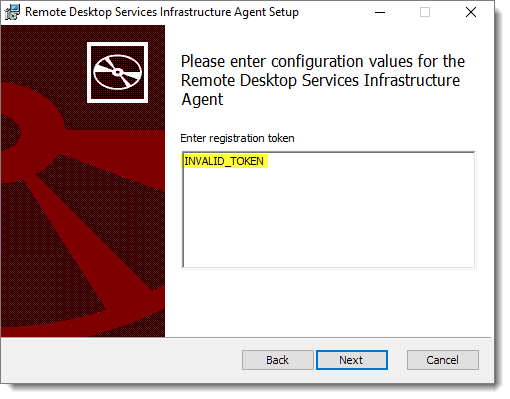
Tip: Look at the last 5 characters of the string do they match the last 5 characters in Notepad?

If the registration token string looks correct, then go ahead and finish the install, taking all the defaults. Then install the boot loader as well as taking all the defaults. Lastly, reboot the VM.
Wait a few minutes before checking the status of the VM (session host) by running the command below in your elevated PowerShell session.
Get-RdsSessionHost CompanyWVDtenant WVD-Host-Pool02
If all went well, then the result should be similar to below. The VM is now available in the correct host pool. If needed, repeat the steps above as needed to add any other missing VMs (session hosts) to WVD-Host-Pool02 before moving onto the next step.

Step 3: Assign Users
Earlier, we created the Desktop and Remote Application group host pools, “WVD-Host-Pool01″ for desktops and “WVD-Host-Pool02″ for remote applications. Now we are going to assign a user to be able to access the resources in each pool. See below for examples, and remember to change “CompanyWVDtenant” to the correct tenant name for your organization, (i.e., whatever you specified in #17 above), and change “[email protected]” to the correct user name UPN for the user as they show in your Azure portal.
Add-RdsAppGroupUser -TenantName CompanyWVDtenant -HostPoolName WVD-Host-Pool01 -AppGroupName “Desktop Application Group” -UserPrincipalName [email protected]
Add-RdsAppGroupUser -TenantName CompanyWVDtenant -HostPoolName WVD-Host-Pool02 -AppGroupName “Remote Application Group” -UserPrincipalName [email protected]
Tip: Don’t assign accounts that only live in Azure AD to Application Groups, use accounts that live in both Azure AD and an OnPrem AD environment.

Step 4: Subscribe User Account
The next step is to visit https://rdweb.wvd.microsoft.com/webclient/index.html (or use the Remote Desktop Client: http://aka.ms/wvd/clients/windows) from your client machine then subscribe the user account you assigned resources to in the previous step.

Step 5: Select Options
During the subscription process, you can click whichever options you like on the page below. I chose to uncheck the “Allow my organization to manage my device” and then click “This app only.”

Although our account gets assigned to the “Desktop Application Group” and “Remote Application Group,” you only see one icon labeled “Session Desktop.” It is because we have not published any remote applications, so there is nothing to see on the “Remote Application Group” side.

Publishing Apps
Step 1: Remote Application Group
Before we can publish any apps, we first need to see which apps are available and common to all machines in the “Remote Application Group.” To do this, run the following command in an elevated PowerShell (or PowerShell ISE) session.
Get-RdsStartMenuApp CompanyWVDtenant WVD-Host-Pool02 “Remote Application Group”
If all goes well, then you receive a list of applications that can be published similar to below.
TenantGroupName : Default Tenant Group
TenantName : AZURE_DOMAIN_NAME.COM
HostPoolName : WVD-Host-Pool02
AppGroupName : Remote Application Group
AppAlias : firefox
FriendlyName : Firefox
FilePath : C:\Program Files (x86)\Mozilla Firefox\firefox.exe
CommandLineArguments :
IconPath : C:\Program Files (x86)\Mozilla Firefox\firefox.exe
IconIndex : 0

TenantGroupName : Default Tenant Group
TenantName : AZURE_DOMAIN_NAME.COM
HostPoolName : WVD-Host-Pool01
AppGroupName : Remote Application Group
AppAlias : googlechrome
FriendlyName : Google Chrome
FilePath : C:\Program Files (x86)\Google\Chrome\Application\chrome.exe
CommandLineArguments :
IconPath : C:\Program Files (x86)\Google\Chrome\Application\chrome.exe
IconIndex : 0
Step 7: Run Commands
As an example, to publish the apps above (Chrome and Firefox), you would run the following commands in your elevated PowerShell session after changing “CompanyWVDtenant” to the correct tenant name for your organization.
New-RdsRemoteApp CompanyWVDtenant WVD-Host-Pool02 “Remote Application Group” -Name "Chrome" -AppAlias googlechrome
New-RdsRemoteApp CompanyWVDtenant WVD-Host-Pool02 “Remote Application Group” -Name "Firefox" -AppAlias firefox
Rinse and repeat for any additional applications you wish to publish using the above as a guide.
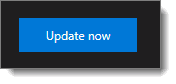
Step 2: Update Remote Desktop Session
After running the commands above, you can return to the Remote Desktop session window and wait for it to update. You can also manually update the feed by clicking the second ellipsis in the top right-hand corner of the window and then click on “Details.” For your last step, click on “Update Now.” Note: If you are using the Remote Desktop Web client site instead, then you can refresh the page to see the new icons.

You should now see new icons present for any apps you published.

QUICK TIP: Some Application Icons May Not Show Up Correctly!!
Occasionally, some application icons may not show up correctly. You can work around the issue by pointing the icon at any image file present on all VMs in the particular host pool you are publishing applications to, as is shown in the example using Chrome.
Note: In my example below, the icon path I used changes as Chrome updates, so probably not the best choice for this icon.
First, you need to unpublish the application with the missing icon.
Remove-RdsRemoteApp CompanyWVDtenant WVD-Host-Pool02 “Remote Application Group” -Name "Chrome"
Second, you need to republish the application using custom icon settings
New-RdsRemoteApp CompanyWVDtenant WVD-Host-Pool02 “Remote Application Group” -Name "Chrome" -AppAlias googlechrome -IconPath "C:\Program Files (x86)\Google\Chrome\Application\75.0.3770.142\VisualElements\smalllogo.png"
Step 3: Pull up Window 10 Desktop
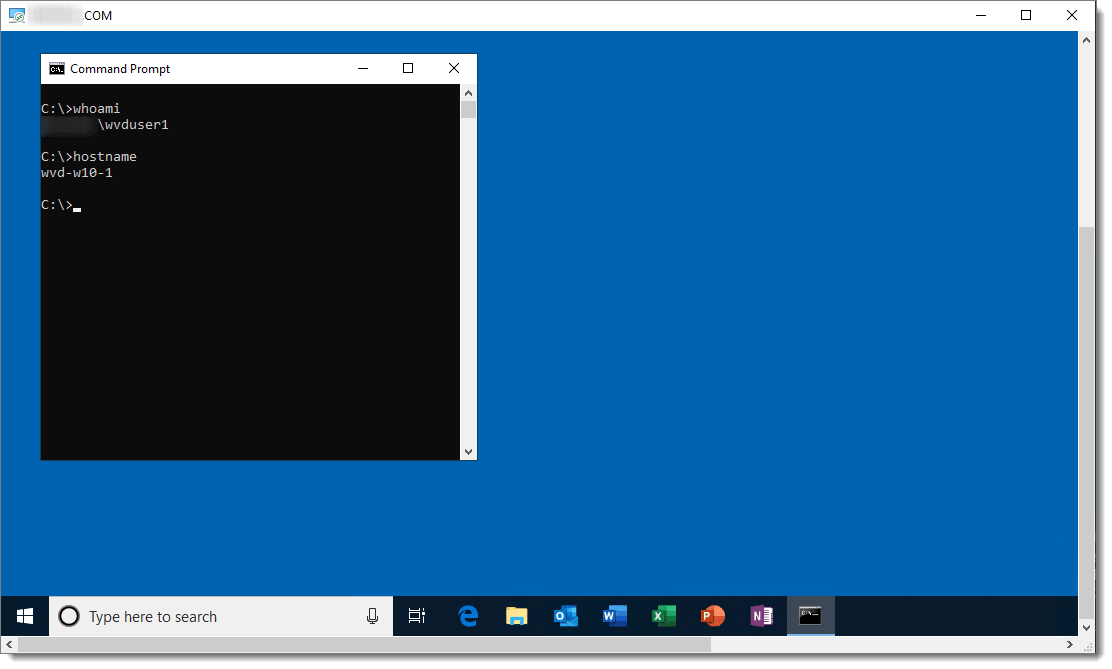
If you double-click on the “Session Desktop” icon, you get a full Windows 10 desktop, which is either wvd-w10-0 or wvd-w10-1.
Note: If you want to rename “Session Desktop” to something more description, see the example below.
Set-RdsRemoteDesktop -TenantName CompanyWVDtenant -HostPoolName WVD-Host-Pool01 -AppGroupName "Desktop Application Group" -FriendlyName "Win10 on Hostpool1"
QUICK TIP: Make Sure to click only “Session Desktop”
If you double-click on an application (anything other than “Session Desktop”), you get that application only.
Note the icon on the taskbar has the remote desktop client icon letting you know that it is a remote desktop application.
Think You Know VDI? Think Again
VDI is a powerful way of ensuring you can deliver a normal Windows image to your BYOD users. But it requires careful implementation to ensure that the user experience is optimal, efficient and secure. The whitepaper shows you some of the key points to watch for in setting and delivering your VDI image to your users, and how adding PolicyPak to your toolbox grants you increased control over both the VDI image and the applications within it.
Congrats, We’re Done!
And that’s it. Well, there was a lot to do to get to this point, but you have done it. The WVD solution that you just implemented provides users with multi-session Windows 10 virtualized experiences. Because it is cloud service driven, it is highly scalable and always up-to-date. Once you complete the legwork to create the supporting infrastructure for WD, you can quickly deploy modern and legacy desktop app experiences using the unified Azure management portal.
We hope you have enjoyed the journey. More importantly, we hope you have learned something along the way. If you found this blog series to be valuable, then we encourage you to refer others to this site. Thanks for visiting.

Final Thoughts
If you want to learn more about WVD, here are some quick wins.
First, is Microsoft’s training on it. https://docs.microsoft.com/en-us/learn/paths/m365-wvd/
Second, here’s all the sessions at Ignite 2019: https://techcommunity.microsoft.com/t5/Windows-IT-Pro-Blog/A-guide-to-Windows-Virtual-Desktop-at-Microsoft-Ignite-2019/ba-p/976831
Lastly, here’s WVD’s documentation: https://docs.microsoft.com/en-us/azure/virtual-desktop/ and a link to the WVD partners, of which PolicyPak is proud to be in the first dozen. https://docs.microsoft.com/en-us/azure/virtual-desktop/partners
Acknowledgements
I’d like to thank David Miller of PolicyPak for documenting and testing the entire process end-to-end. We couldn’t have produced such a comprehensive walkthrough without his efforts. I’d also like to thank Brad Rudisail for helping to edit and co-write this piece.