Dell SonicWall is a an extremely popular Firewall and UTM device for businesses. The SonicWall suite of products currently protects over forty million users. Dell SonicWallGlobal VPN Client connects mobile workers connect to their parent networks.
The SonicWallGlobal VPN client is a critical application in these circumstances which is why PolicyPak supports it along with dozens of other applications.
The SonicWall Global VPN Client needs specific controls.
The last thing you want is end-users calling you (or the helpdesk) from some remote place asking you why their VPN connection isn’t working, or, worse try to mess with the settings themselves to restore a connection.
Make sure that the settings for your users’ SonicWall Global VPN clients don’t get locally reconfigured. Secure those settings, using PolicyPak. Check out this video to see how it’s done:
Once the SonicWall Global VPN Clientis deployed to your users, you’ve got no way to manage this application. Users can simply work around your settings and that’s when bad things can happen for such a critical little application such as this!
With PolicyPak, you’re the one in control.
Besides, once you’re using PolicyPak to manage Dell SonicWall, you’ll also get to manage all your other enterprise desktop applications the same way: Flash, WinZip, Firefox, and any custom applications you have. They’re 100% included – absolutely free.
It’s all included when you’re a PolicyPak Professional customer.
PolicyPak was designed by Microsoft MVP, Enterprise Mobility Jeremy Moskowitz – who “wrote the book” on Group Policy, runs GPanswers.com, and lives and breathes Group Policy and enterprise software deployments and desktop lockdown.
When you’re ready to get serious about managing Dell SonicWall, PolicyPak is ready for you.
Manage SonicWall Global VPN Client with Group Policy video transcript
Hi, this is Jeremy Moskowitz, Microsoft MVP, Enterprise Mobility and Founder of PolicyPak Software. In this discussion, we’re going to learn how to use PolicyPak to manage Dell SonicWall’s Global VPN Client using Group Policy and PolicyPak. I’ve already got the VPN client installed on my computer, and I’m just a regular user here. As you can see, I’m logged on as a guy called “eastsalesuser4.” If I open up the application View | Options, I have a number of tabs that display various display settings
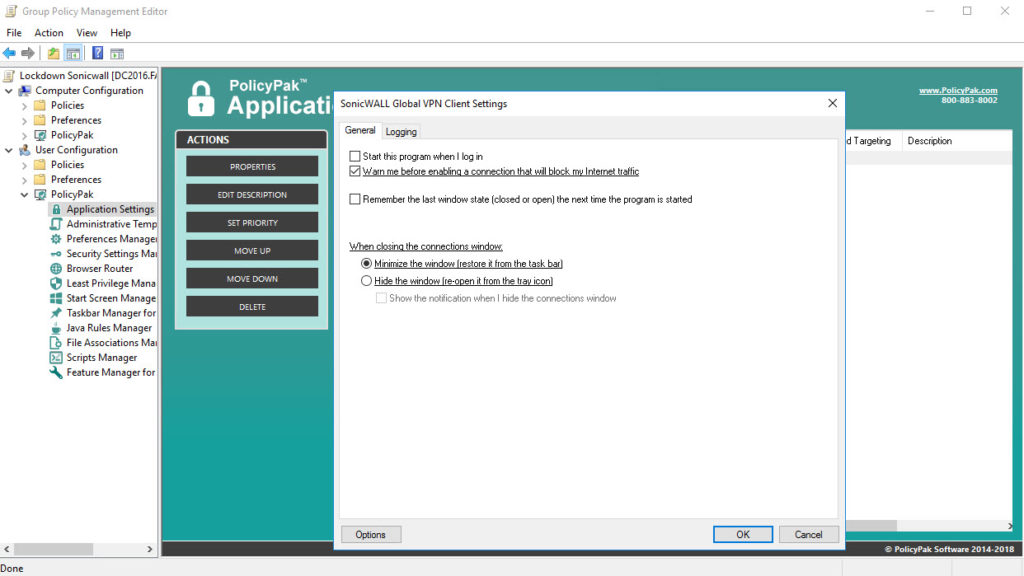
Let’s start off here with “General.” This tab covers some basic but important settings here, especially our second checkbox selection. If we look at “Logging” and then click the Settings button, I have some very important configuration settings concerning the size of my log files and what overwriting functions, if any, that I want. There aren’t a lot of settings here but this is an application that is the life blood connection between the user’s remote computer device and their parent network so it is critical that your users can’t mess things up by changing the settings that you, the administrator, have configured.
Let’s go over and see how we would manage these settings quickly using PolicyPak. I’ll go ahead and switch over to my Management Station computer.
We’ll go ahead and right click over our “East Sales Users” here, “Create a GPO” and we’re going to call it “ManageSonicWall.” So this GPO is now associated with the “East Sales Users.” I’ll right click over. I’ll click “Edit…” here. I’ll dive down under “User Configuration,” “PolicyPak/Applications/New/Application.” There it is, “PolicyPak for SonicWall Global VPN Client” along with our other applications like Firefox, Flash, Office, Shockwave, Skype and lots of other important desktop applications.
Let’s start off here with the “General tab.” We said that the second checkbox, “Warn me before enabling a connection that will block my internet traffic” is selected by default and we want to make sure that this box is always checked so let’s uncheck the box and recheck it. Notice that this setting description is now underlined which means that this check box value will be delivered to the user.
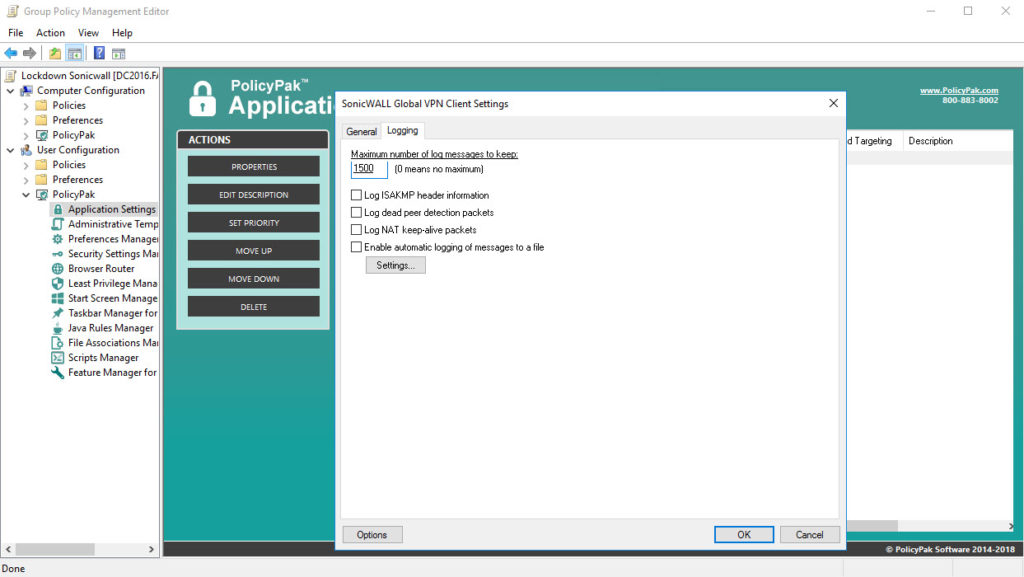
Now we’ll go to “Logging” and make some quick configuration selections. Let’s change the number of log messages to 1500 by simply typing it in and making sure that the new value is underlined. Let’s also check “Log NAT keep-alive packets” and “Enable automatic logging of messages to a file.” Let’s then click the Settings button. Let’s uncheck and check both of the check boxes on this tab and let’s change the maximum auto-log file size to 5MB. Finally, let’s choose Overwrite auto-log file in the spinner box here at the bottom of the tab.
Now I will go back to my client machine, we’ll get a command prompt and run “gpupdate.” Now you could envision the user logging on for the very first time, using a Terminal Services or Citrix machine, using a VDI session, changing job roles, or getting a new computer.
PolicyPak performs the magic. To get the magic delivered, you can use Group Policy, SCCM, LanDesk, KACE or your own systems management software. We just happen to be using Group Policy to deliver PolicyPak directives in this demonstration.
Now that that’s done, we’ll go ahead and reopen the SonicWall client application. Now if we go to “General” as a user, we can see that the same check box is selected.
Now let’s go to “Logging.” We can easily see that the maximum number of logging messages is indeed 1500 as we wanted and that the automatic logging to a file feature is indeed enabled. Now let’s click the Settings button and just confirm that all of our desired configuration changes have been enforced which they are as you can see. PolicyPak is indeed doing its thing.
And we are done. That is how incredibly easy it is for you to use PolicyPak to manage and lockdown the Dell SonicWall VPN client and tons of other desktop applications.
If you’re looking for a trial of PolicyPak, just click on the “Webinar / Download” button or sign up for a webinar on the right.
Thanks so much for watching, and get in touch with us if you’re looking to get started. Talk to you soon.


